


DIY Christmas Crafts: Handmade Decorations, Gifts & Projects for All Ages
Author: The Art Shed Team Date Posted:3 November 2025

Let’s be real, Christmas gets expensive fast. Between the gift wrap, the matching PJs, and yet another secret Santa you forgot to budget for, it adds up quick, so whether it’s scrolling Pinterest for handmade Christmas inspiration, searching for DIY Christmas crafts that don’t need a full toolbox, or just craving that cosy, homemade vibe, we get it.
This blog is your go-to guide for a more creative, more affordable, and way more fun kind of Christmas.
From handmade Christmas trees, DIY fake gingerbread cookies that look dangerously real, decorative Christmas plates, and festive handmade gifts that actually feel personal. Every project here is simple enough for beginners, low-cost, and made using art supplies you probably already have, or can easily grab at Art Shed, of course.
So if you’re looking for ways to decorate on a budget, make your gifts stand out, or just feel a bit more crafty this Christmas, light a candle, pop on some Bublé, and let’s get cracking. Your festive Pinterest board is about to come to life, with a whole lot more personality.
.png)
The Lazy Genius’s DIY Paper Christmas Tree
Christmas décor these days is either a Pinterest fever dream or a $90 panic purchase from a department store that smells like cinnamon regret.
But what if we told you that you could create your own DIY Christmas tree in under 20 minutes, using nothing but paper, glue, and a sprinkle of festive delusion?
This one’s for the artists, the procrastinators, the chaos crafters, and the people who forgot to buy decorations (again).
And yeah, it’s also for your mum’s mantelpiece. Let’s go.
Materials:
Difficulty: Beginner
Time: 1–2 hours
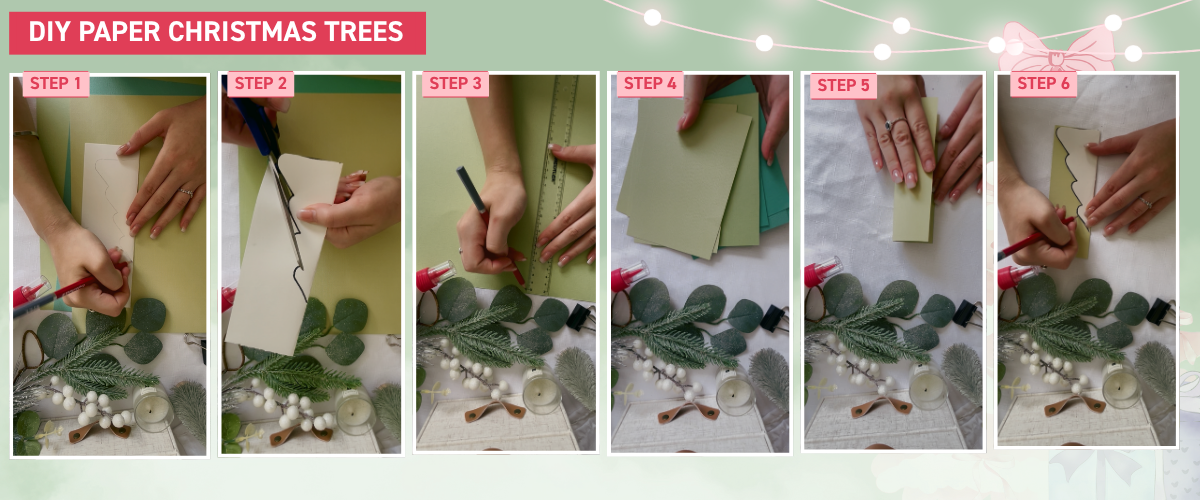
Step one
Grab a sheet of Canson paper or coloured craft paper of choice and fold it hotdog-style. Along the crease, draw half a Christmas tree, pointy top, zigzag branches, wonky trunk.
No one's marking you. Just make it vaguely tree-shaped.
Tip from the shed- Draw it on the crease side, not the open side. We’ve made that mistake..
Step two
Cut along your drawn line (while it’s folded), then open it up like a Christmas miracle, bam! A full, symmetrical-(ish) paper Christmas tree. This is your Holy Grail template. Guard it with your life.
Step three
Measure and Figure out how many trees you can squeeze out of your paper stash. Trace around your tree template 15 times. Yes, 15.
No, we don’t make the rules. But we do like chunky trees, so trust the process!
Tip from the shed- Use a ruler to divide up your paper neatly. Or don’t. Just vibe it.
Step four
Each time you cut out a new sheet, fold it in half again.
Place your sacred template on the crease and trace that half-tree like it’s your year 7 woodwork exam.
Then cut it out. Again. Keep it folded. Repeat 15 times. Pop a Christmas movie on. Hydrate. This is hard work!
Step five
Once you’ve got 15 folded tree pieces (or however many you were bothered to make— we’re not checking), stack them so all the creases line up.
Use bulldog clips to hold one side together like a paper sandwich.
Step six
Grab your Mont Marte craft glue and paintbrush and lay it on thick. You’re not glazing a donut, this is structural! Paint along the folded spine edge like you mean it.
Seriously. Be generous. No skinny gluing.
Tip from the Shed- Put a scrap sheet underneath. Or don’t, and ruin your table forever like we did. Festive choices!
Step seven
Keep your stack clamped with the clips and let it dry for a few hours (or overnight if you’re the patient type).
If you touch it before it’s dry, it will betray you.
Step eight
Once dry, take off the clips and open your chunky tree like a paper accordion.
Find the two outer flaps that match, smother them in glue, and stick them together.
Final step
You now have a freestanding, papery pine that won’t drop needles that make you question your festive choices.
Display it on the table, the windowsill, the toilet, whatever! Want to level it up? Add some glitter, a pom pom star, or paint details on the edges.
This is hands down one of the easiest DIY Christmas tree crafts you’ll ever do, no weird tools, no mess (unless you’re really trying), and it works with scrap paper if you're on a budget and looking for more affordable creative christmas crafts.
.png)
DIY Christmas Trinket Tray
Let’s make one thing clear, this is not your average tray. This is a festive, hand-sculpted DIY Christmas trinket tray, complete with a clay Christmas tree, presents, baubles, and enough chaotic charm to make your guests go “wait, you made that?”
Perfect for jewellery, keys, or rogue bobby pins you’ll never use again, this tray is both art and function. Which is how we like it.
Materials:
Mont Marte Signature Acrylic Paint Set 18pc
Mont Marte Sculpting - Clay Tool Set 11pc
Mont Marte Polymer Clay Roller
Mont Marte Natural finish Clay Sealer
Mont Marte Signature Gloss Finishing Acrylic Varnish
Difficulty: Intermediate
Time: 1–2 hours plus drying time
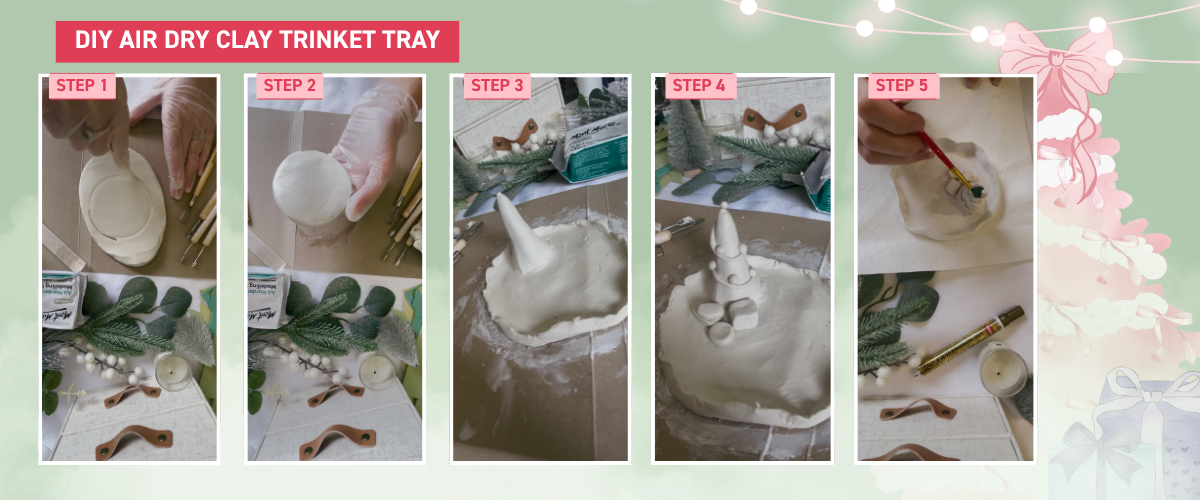
Step one
Grab a chunk of Mont Marte air dry clay and flatten it into a slab about 1cm thick. Use a rolling pin (or anything cylindrical you’re not emotionally attached to).
Tip from th shed- Make sure it's even-ish. Lumpy slabs means a wobbly tree.
Step two
Use a cup or round object to cut out a circle, this is the base of your tray. You can go rogue with the shape, but don’t blame us if it dries looking like a Dorito.
Smooth the top and edges with your fingers and a bit of water to get those crisp, soft edges.
Step three
Roll a cone-like shape with your clay, this is your mini Christmas tree. Smooth it out with water until it looks less like a sad ice cream and more like a pointed cone shape.
Take a clay tool and score the base of the tree and the tray where you want it to sit. Smear a bit of water on both, press it down, and use your tool to drag some of the clay from the tree base onto the tray. Then smooth it out with your finger so that baby isn’t going anywhere.
Step four
Roll out a thin snake of clay and wrap it around the tree in a cute little spiral, this is your garland. Then, make tiny clay balls for the baubles. Important: SCORE AND SMOOTH THEM DOWN.
We lost many good ornaments in the testing phase. Don't make our mistakes.
Bonus: Use different ball sizes for that delightfully messy festive energy.
Step five
Craft some basic clay presents, squares, rectangles, round blobs pretending to be toys, go wild.
Stick them around the tree, score and smooth as needed so they don’t pop off later
Step six
Roll a thick clay snake and wrap it around the base of the tray like a chunky wall. Score where it meets the tray and smooth it down. Smooth the outside and inside with water so it looks intentional. This is the walls of your trinket tray.
Step seven
Leave your trinket tray to dry overnight, preferably somewhere it won’t be knocked by pets, kids, or your own clumsy hand.
Step eight
Now it’s time to give this beast some Christmas spirit:
Base coat the whole thing in white acrylic paint to even out the surface.
Paint your tree green, garland beige, baubles red and gold, and the presents a wild mix of ugly Christmas jumper colours. The clashier, the better.
Use the krylon gold leafing pen to highlight the star and the edges of the tray for maximum sparkle
Step nine
Finish with a thin coat of Mont Marte clay sealer, then slap on some mont marte acrylic gloss varnish for that glazed donut shine.
You now have a festive tray that looks like it cost $45 at a boutique Christmas market, but actually cost you 2 hours, a cup of tea, and mild emotional damage. We call that a win.
This DIY is equal parts cute and chaotic and it makes a great handmade christmas gift. Wrap it up, throw in a few choccies, and suddenly you’re the artsy cousin everyone envies.
These are especially good for Christmas craft nights.
.png)
.png)
DIY Painted Christmas Plate
Want a painted Christmas plate that screams “fun festive chaos” and not bulk décor from the sad aisle at the back of the store”? Say no more. Whether you’re decorating for fun, crafting with the kids, or trying to avoid wrapping presents, this one’s easy and dangerously addictive.
Fair warning: once you paint one, you’ll want to paint ten.
Materials:
Mont Marte Signature Acrylic Paint Set 18pc (for decorative plates only, not food-safe, don’t eat off these unless you like spice with your salmonella)
Mont Marte Paint Set - Ceramic Paint 6pc (for actually usable, food-safe plates)
Mont Marte Acrylic Paint Pens Broad Tip in Case
A blank white plate (ceramic or porcelain, no need for fine china)
Tip from the shed: Give the plate a quick clean first unless you want to seal in a layer of mystery fingerprints forever.
Difficulty: Beginner
Time: 1 hour
Step one
Start with a basic white acrylic paint sketch of a Christmas tree in the centre of the plate. Doesn’t need to be perfect, we’re going for Dr. Seuss energy here. Let that dry before moving on.
Step two
Around the edges of the plate, use a pink paint pen to sketch a wavy, bumpy, graphic border for festive maximalism.
Fill the border in with Mont Marte’s pastel pink acrylic paint using a small detail brush. Don’t stress if it’s not perfectly inside the lines, it adds charm (or so we tell ourselves).
Step three
Add Some Holly… Or Mistletoe… Or Something Vaguely Leafy Grab a green Mont Marte paint pen and draw three little lines and a dot to mimic holly, mistletoe, or whatever Christmas plant lives in your imagination. Pop this little herb doodle wherever feels right, we’re not botanists.
Step four
Now the fun bit. Choose two clashing shades of green, and paint the tree in layered stripes, dark, light, dark, light, to give it that Grinchy‑Whoville look.
If it looks a little wonky, even better. Embrace the chaos.
Step five, details
Paint the star yellow (classic, can’t go wrong)
Colour the stump brown.
Let it all dry, then hold it up like Simba on Pride Rock and bask in your festive glory.
Tips from the Shed- Want to actually eat off your plate? Use ceramic paint and make sure to follow the baking/sealing instructions on the packaging.
If it’s purely decorative, feel free to go nuts with acrylics and paint pens, just don’t pop it in the dishwasher unless you want it to return to the void.
These make amazing DIY gift ideas, especially when paired with homemade cookies, chocolate bark, or that one snack you pretend is a secret family recipe.
.png)
DIY Watercolour Christmas Card (Beginner-Friendly Snow Globe Edition)
You don’t need to be a watercolour expert to create something heartfelt and festive, and I should know, because our actual expert wasn’t available for this one. So I gave it a go myself.
With a bit of paint, a little patience, and a Christmas playlist on in the background, I managed to pull together a very cute (slightly wonky) DIY snow globe card.
This handmade Christmas card is simple, creative, and easy enough for beginners, but still thoughtful enough to become someone’s favourite on the mantle.
Materials:
Mont Marte Watercolour Postcards
Mont Marte Watercolour Half Pan Set
Mont Marte Watercolour Brushes
Water and a cup
Paper towel
Difficulty: Beginner
Time: 30–60 mins
Step one
Start by grabbing a cup and using your pencil to lightly trace a circle in the centre of your watercolour postcard.
From there, draw a little base at the bottom to turn it into a snow globe. Doesn’t need to be perfect, wobbly is whimsical.
Step two
Mix up a light, metallic grey-blue shade and brush on a sheer wash inside the globe. You’re just laying down a soft base colour, almost like a frosty tint.
While that’s still a little damp, add a deeper blue-grey around the edges to create a soft halo effect and some depth.
Go slowly and let the brush do the blending, you’re painting a snow globe, not pressure-washing a driveway.
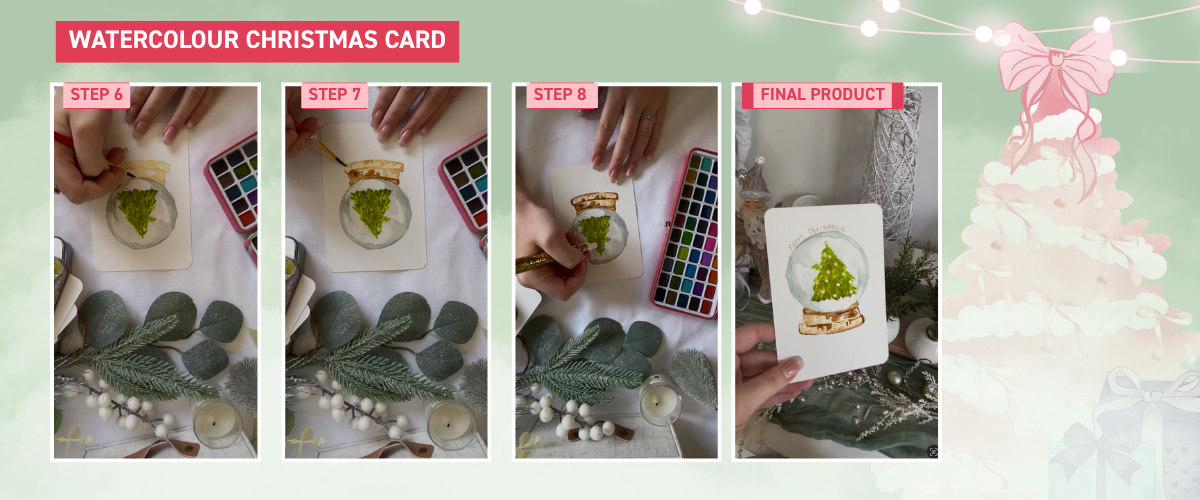
Step three
Use a light green and create quick, sketchy strokes in a triangle shape to form a tree.
Then layer on darker greens: mid-tone through the centre and darker shades concentrated toward the base to build shadow and dimension.
Ours was a bit… “freestyle.” You might want to lightly sketch the tree first if you’re going for something a bit more symmetrical.
Step four
Take a beige tone and apply a light wash to the base.
While that’s drying, mix the same colour with less water to create a deeper opacity and layer on some shadows.
Finish it off by adding a few final strokes of a darker brown to define the base and give it that, rounded look.
Step five
Time to bring the sparkle.
Use your Krylon gold pen to draw a tiny star on top of the tree
Dot a few gold baubles on the branches
Add your name, a greeting, or just leave it blank and mysterious, up to you
Let it dry fully before handling or popping it in an envelope. (Or smear it artistically. Again, your call.)
This handmade holiday card is heartfelt, relaxing to paint, and 10x more meaningful than anything store-bought. You don’t need to be a watercolour wizard, just grab your brush, have fun with it, and let the imperfections be part of the charm.
And hey, if it turns out a little wonky like ours? Just say it’s intentionally rustic. That’s the vibe anyway.
.png)
DIY Fake Christmas Cookies (Too Cute to Eat, Literally)
We all love the look of freshly baked gingerbread cooling on the bench, but let’s be honest, they rarely last longer than five minutes (especially if your housemates or co-workers have no self-control).
So instead of baking and guarding your biscuits like a Christmas dragon, we made a batch of fake Christmas cookies for display instead. They’re cute, customisable, totally inedible, and weirdly satisfying to make.
Fun side note: these turned out so realistic that a few people in the marketing team got cravings and left mid-shoot to go buy actual gingerbread men. So yeah. They pass the test.
Materials:
Mont Marte Modelling Paste (this is your “icing”)
Mont Marte Signature Acrylic paint set 18pc
A plastic ziplock or piping bag
A bit of cardboard (we used part of an old box — very sustainable, very scrappy)
Difficulty: Beginner
Time: 45 mins
Step one
Cut a flat piece of cardboard to work on. Using a pen or pencil, sketch out your cookie shapes, we went with gingerbread houses, but stars, trees, or candy canes would all work too.
Cut them out with scissors. Don’t stress about perfect lines, that slightly wobbly, home-made look is exactly what makes them convincing.
Step two
Mix up a warm gingerbread colour using brown and white acrylic paint (we used Mont Marte Acrylic Colour in Burnt Umber + Titanium White).
Give each cut-out a solid coat and let them dry. You’re aiming for that soft nutty beige that looks good enough to eat, but don't, obviously.
Step three
Scoop some modelling paste into a corner of a ziplock bag (or an actual piping bag if you're fancy).
Snip a small hole in the tip, and voilà, you’ve got yourself an icing bag.
Tip from the Shed- Test your pressure on some scrap paper before committing to your “cookies.” This paste dries fast and firm, so treat it like the real thing!
Step four
Pipe on whatever details you want, outlines, swirls, dots, windows, little snowdrops, whatever you feel like. You can even tint the modelling paste if you want coloured “icing.”
Leave them to dry completely. We found the imperfections make them even more believable. Homemade charm is clearly the theme of this whole blog.
Step five
Once they’re dry, pop them onto a plate, tray, or under a cloche and watch everyone do a double take. They make adorable table centrepieces, photography props, or window displays.
These DIY fake Christmas cookies are festive, mess-free, and will last year after year. Unlike real biscuits, they won’t go stale, attract ants, or mysteriously vanish after you leave the room.
Make a whole tray. Make a fake cookie advent calendar. Make one so convincing your nan tries to dip it in her tea. We support you.
.png)
Frequently Asked Questions With Art Shed
How can I create handmade decorations on a budget?
Create affordable handmade decorations by using leftover paint, repurposed cardboard, simple shapes, and one base tool set. Limiting your palette and re‑using materials across multiple items helps reduce cost and maintain design cohesion.
Which materials are best for beginner‑friendly craft projects?
For beginners, materials like mont marte air‑dry clay, acrylic paints like mont marte acrylic colour, mont marte crafters colour or liquitex basics acrylic, simple brushes, cardboard or wood off‑cuts, and basic adhesives work well. These are easy to use, widely available and suit a broad range of DIY projects without needing specialised equipment.
What are fun and easy craft ideas for kids this Christmas?
Fun and easy kids’ craft ideas include paper trees, painted ornaments, salt‑dough shapes, and personalised cards. These allow children to explore creativity with minimal tools, with finishes that feel festive and kid‑friendly.
What’s the best acrylic paint for craft projects?
The best acrylic paint for craft projects delivers opaque coverage, dries quickly and is compatible across surfaces. Look for a high‑pigment, craft‑specific brand that supports DIY décor and handmade gifts , beginner‑friendly and durable. We recommend Mont Martes crafters colour or Mont Marte Signature.
What are the trending colours and style themes for christmas right now?
Trending colours include blush pink, burgundy, forest green, navy, soft neutrals and metallics. Style themes emphasise bows, layered textures, up‑cycled looks, and a mix of vintage and modern aesthetics.
What’s the best glue or adhesive for mixed‑media and paper craft projects?
For heavier or mixed‑media materials use a clear‑dry gel adhesive or PVA craft glue. For layers of paper and lighter materials, use a glue stick or double‑sided tape for smoother application and less mess.
What are beginner‑friendly giftable craft ideas and how do I personalise them?
Giftable crafts that work well for beginners include painted mugs, watercolour cards, clay ornaments and trinket dishes. Personalise them with names, custom colours or hand‑written dates to make them one‑of‑a‑kind.
What type of paint works best on air‑dry clay?
Acrylic paint works best on air‑dry clay because it adheres well, layers smoothly, and dries quickly. Apply thin coats for even coverage and finish with a clear sealer or varnish to protect the surface and enhance colour vibrancy.
How do I seal and protect handmade crafts so they last?
To protect handmade crafts, allow the project to dry completely, then apply a layer of clay sealer or clear varnish. For extra durability, add a second coat of acrylic gloss varnish. This prevents cracking, fading, and dust buildup on clay, paper, or painted pieces.
What are some creative DIY ideas for a Christmas girls’ night or crafternoon? Creative DIY ideas for a Christmas girls’ night include painting ornaments, decorating clay baubles, folding paper trees, or designing personalised cards. Paint your own hairbrushes have also become popular this year. Pair the projects with festive music and snacks for a relaxed, social, and creative holiday experience.

Want to Stock Up for Your Christmas DIYs?
Ready to get crafty?
Shop everything featured in this blog (and then some) from Art Shed’s epic range of art supplies:
Shop the Christmas Sale – for discounted supplies, festive faves, and shedloads of colour
Browse pre-packed crafts and kits – perfect for gifts, classrooms, or easy peasy group activities
Explore the full range – every supply you need to make your own magic
And that, my craft‑loving legends, is your full suite of festive, budget‑smart, artsy Christmas DIYs.
Whether you’ve made a paper Christmas tree, a watercolour card, a clay bow candle holder or some fake gingerbread cookies, you’re now equipped for a handmade Christmas that actually feels personal, not just mass‑produced.
Take a step back, sip something warm, admire your creations (maybe clean up the paint spills later) you’ve earned it. Here’s to décor that tells your story, gifts that carry your touch, and a holiday season filled with creativity, colour and joy.
Keep the Festive Fun Going
Explore more holiday content from Art Shed:
Best Christmas Craft Kits & Sensory Gifts for Kids (2025 Australia)
What’s Coming to Art Shed for Christmas 2025: Luxe Art Gifts to Keep an Eye On
DIY Handmade Christmas Projects for an Arty Christmas
Christmas Gift Guide for Creative Teen Girls (2025 Edition)
Christmas Gifts for Teen Boys Who Love Art (2025 Guide)
How to create your very own Christmas Cards with foil techniques!
.png)