DIY Handmade Christmas Projects for an Arty Christmas
Author: The Artshed Team Date Posted:7 October 2025
Creative Ideas for an Arty Christmas - Part 2
.png)
Buckle up because Part 2 of our DIY Handmade Christmas Projects is here! We've curated some easy Christmas crafty projects for you to try this festive season. Get out the glitter and gold - we're going hard on the sparkle to maximise the joy this year!! From simple gold lettered kraft swing tags, to luxe Christmas artwork and painted santa stocking holder pegs - we've got a fun project for you and the whole family to enjoy making!!
1. Merry and Bright Artwork
For this project I was pretty ambitious with my modelling paste skills... I got there in the end and YOU CAN TOO!! I would recommend giving yourself a bit more space inbetween the lettering to work in that modelling paste. I used Mont Marte Discovery Canvas Single Thick 30 x 40cm, Mont Marte Acrylic Paint Pens Dual Tip Gold 2pc to draw the typography design I wanted to cover with Mont Marte Imitation Gold Leaf 14 x 14cm 25 Sheet. I used gold pen underneath just incase any was visible under the gold leaf.
Then using a soft taklon brush I covered the gold lettering in Mont Marte Leafing Size 60ml. Let the leafing size set for 25 mins to allow it to become tacky and then apply the gold leaf gently. Using a bristle brush, gently push away the excess gold leaf. Once you're happy with the results you can start going in around the typography with Mont Marte Modelling Paste 500ml - I used a small palette knife like the Mont Marte Palette Knife No. 2 to really get in all those nooks and crannies around the lettering, but if you're smart and do a simpler design you might not have to worry about that too much! Take your time at this stage, it's really satisfying building up the texture and adds an extra tactile element to this artwork.
I was actually stoked with how this turned out!! I hope you guys give it a go and don't forget to tag us if you do! @artshedonline
.png)
2. Watercolour Wooden Gift Tags
Next up - Wooden Watercolour Gift Tags! For this project I used some left over green watercolour paper washes and cut them in to little eucalyptus shaped leaves to match the table runner we also made! You could use a silver pen to write the gift recipients names on the tag. This project was really simple but effective, using Portacraft Natural Wooden Tags with String 34 x 60mm - 8 Pack, Mont Marte Watercolour Pad German Paper A4 300gsm 12 Sheet, Mont Marte Premium Watercolour Paint Set - Tin 27pc to create those beautiful green and blue coloured washes and then of course Mont Marte Adhesive - PVA Craft Glue 1L to glue the paper to the wooden tags!
.png)
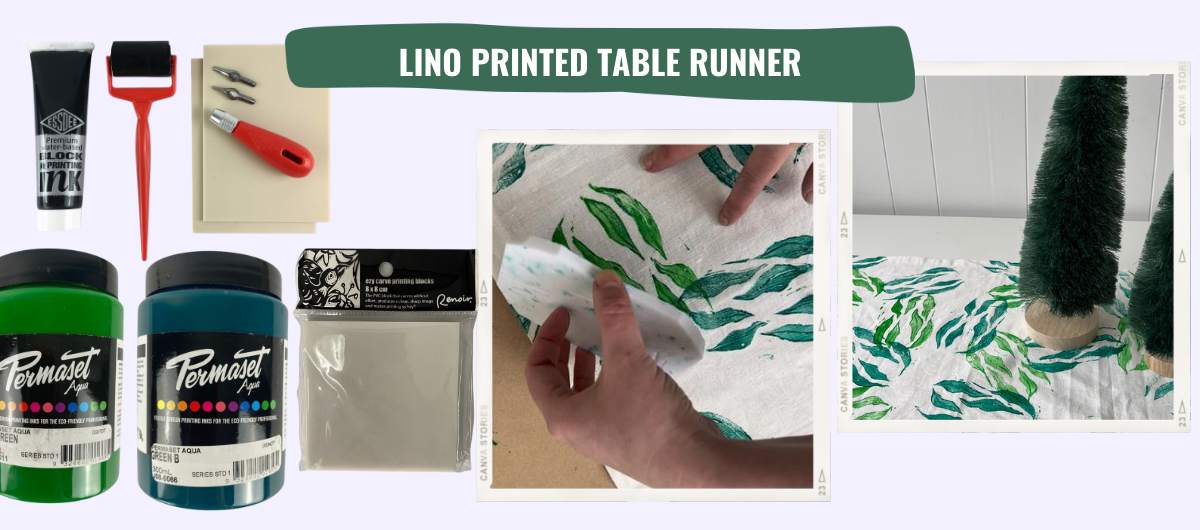
3. Lino Printed Table Runner
Now, I've said it before and I'll say it again LINO PRINTING IS ADDICTIVE!! We grabbed a table runner from the op shop and gave it this beautiful glow up! Using the Essdee Lino Cutting & Printing Starter Kit from a previous project, I grabbed some fresh Renoir Ezy Carve Printing Block 8 x 8cm, and created a eucalyptus pattern design. I started with Permaset Aqua Screen Printing Ink 300ml Standard - Green and then decided to create another layer in Permaset Aqua Screen Printing Ink 300ml Standard - Mid Green to add some more interest to the design. Don't forget to heat set your design once you're happy with it (Permaset - Heat Setting Instructions)
4. DIY Printed Wrapping Paper
Last but not least - Don't forget the presents!! Perhaps you've bought an epic Mont Marte Signature Essentials Mixed Media Art Set In Wooden Case 174pc for someone this Christmas but it needs some gift wrapping! Why not go the extra mile and make it yourself?!
For this project we pulled out all the stops and made our own Christmas Tree stamp - and believe me, I'm going to use it to print on everything. Grab yourself Essdee Lino Cutting & Printing Starter Kit and maybe some extra Renoir Ezy Carve Printing Block A5 14 x 21cm. I grabbed a roll of Portacraft Kraft Wrap Roll 70cm and some Speedball Block Ink Water Based 75ml Tube - Green
Sketch up your design and then once you're happy transfer it to the lino, you can do this by sketching a layer of graphite down on the back of your design and then laying that side down on the lino and tracing over your design. Otherwise you can draw straight on to the Ezy Carve Lino. Cut out your design and start printing! I mixed a tiny bit of black ink with the red to make it a slightly deeper crimson red. Make sure you re-ink your stamp each time as the kraft paper can start to come away if it's too dry.
I used Portacraft 3ply Twine 1.5mm x 9m - Natural to tie up a little bow around my gift and to attach a name tag to. All in all I think it looks pretty cute!

Will you try some of this Christmas crafts these year?