


What is Resin Art?

Resin is a durable and strong medium, leaving a high gloss, protective finish that allows for a variety of desired effects you can create for your art piece. Epoxy Resin is such a versatile product in its ability to be applied to so many surfaces or items used in art in a variety of artistic ways.
From expressive, hypnotic, and magnetic fluid artworks, to simply being applied to everyday items such as wood, glass, terracotta, ceramic tiles, and boards, coasters, dishes and jewellery, just to name a few! Resin also has another use in sealing other artworks like drawings, watercolours, oil paintings, and photographs, creating a beautiful, high-shine, ultra-glossy protective varnish. You can also use Resin in plastic moulds to create ornaments and other goods - options are endless.
.jpg)
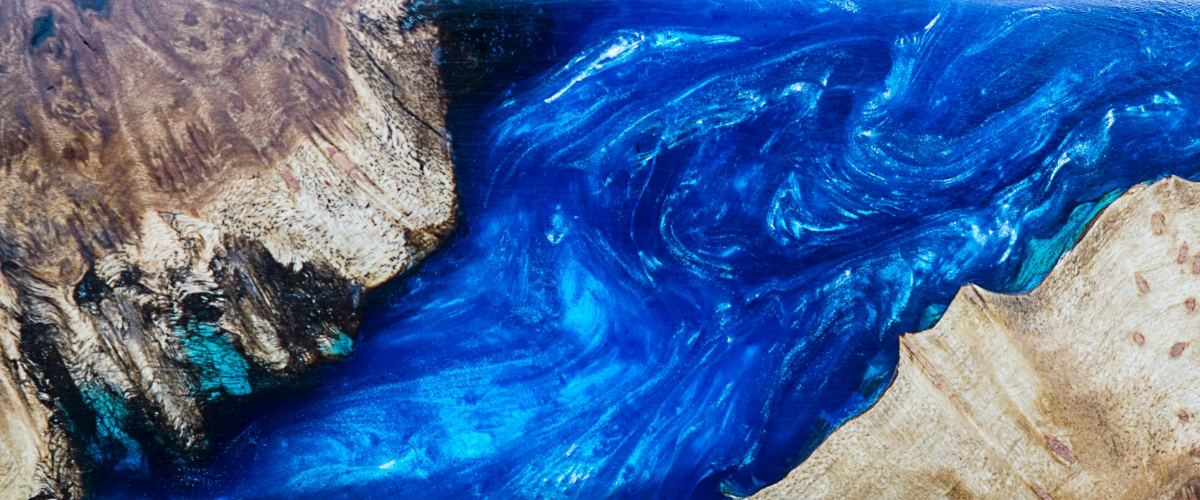
Many resin artists source inspiration from the natural brilliant patterns found in nature, bringing these abstract, synchronized and swirling colours and shapes to life on their chosen materials. By adding elements such as flowers, stones, photographs, glitter and even creating cells using silicone oil, unique and captivating resin artworks can be produced.
Safety precautions when working with resin
It is important to note that resin is toxic when active but is harmless once hardened. So here are a few safety precautions you need to take into consideration.
Always ensure you are working in a well-ventilated room, protecting your skin and eyes with disposable nitrile gloves, long sleeve clothing and protective glasses or goggles. Spills are possible, so be sure to protect your floors and surrounding areas with foil or plastic sheets. If you happen to get any resin on your skin, clean it with vinegar, soap and water.
What you’ll need to create a resin artwork:
.jpg)
Epoxy Resin kit: a 2-part system that includes a resin and a hardener which are mixed together and then cure after a short amount of time.
The Liquid Gloss 2 Part Resin Kit in 250ml or 500ml is also a fantastic option for creating perfectly clear glass-like finishes over the top of paintings or for creating fluid artwork when combined with paint or pigments. Once you have followed your instructions for your mixture simply apply by either pouring or brushing them onto your desired surface. For a few surfaces, we suggest trying, wood, glass, terracotta, ceramic tiles, and boards also can be used in plastic mould to create ornaments and other goods.
.jpg)
-
Pair your Epoxy Resin Kit with the Glass Coat Liquid Gloss Resin Art Accessories Kit, which has all the essential accessories for your very first go with epoxy resin. This kit includes:
- 1 x 500ml Mixing cup
- 4 x 60ml measuring cups
- 4 x plastic mixing sticks
- 4 x disposable glove sets
- 4 x protective mats
.jpg)
-
Resin is heavy, so you’ll want a surface for your art that is strong, non-porous and non-absorbent, like a Wooden board. You can also use plexiglass, glass or metal, or household objects like cutting boards and wooden bowls, tables and kitchen benchtops. Wooden Art Boards make the perfect introductory surface for resin art, offering smooth and solid support. These painting boards are made with a smooth blonde-coloured plywood panel with pine bracing, ensuring strong and warp-resistant painting support.
-
The acrylic pouring paint sets by Mont Marte are perfect for mixing with resin. This ultra-flowy acrylic paint is pre-mixed with a flow medium, creating a lucid, easy-pour formula that flows seamlessly creating stunning marbled effects, so you can get straight to mixing with the resin. This easy-to-use product comes in a set of 4 highly-pigmented, bright colours such as the 60ml in Aurora, Celestial, Cosmic, Ethereal, Flamingo, Rainforest, Symphony and 120 ml Sets in Coral, Golden Beach, Metallic, and Marina. These premixed acrylic pouring paints also come in individual 240ml bottles, which are great for creating larger scale works or for experimenting with your own colour combinations, and are available in an array of bright, highly-pigmented colours. Inks, powder colour pigments and spray paints can also all be mixed with resin to create various other effects and styles of resin art.
-
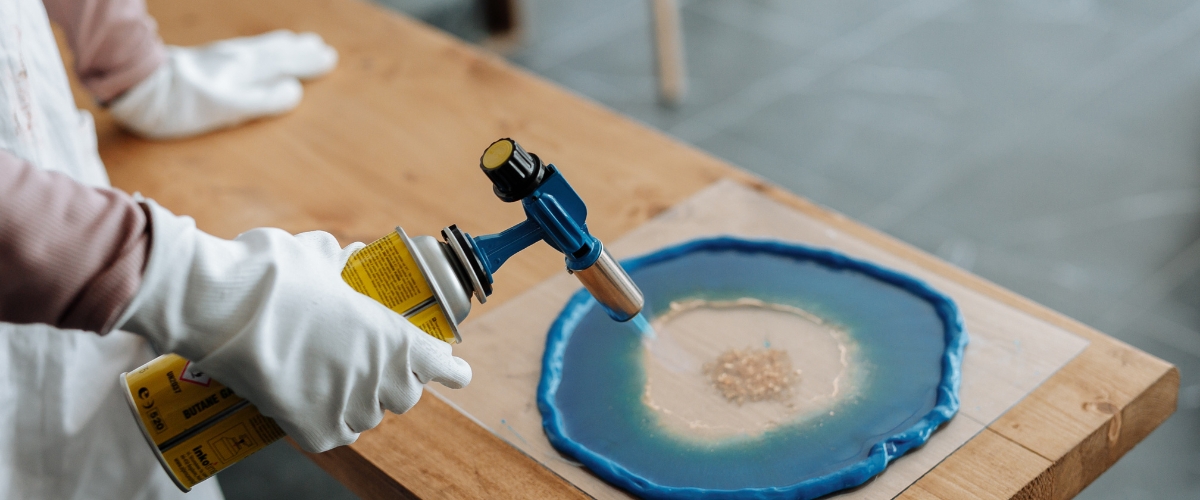
Heat gun- use this to pop any bubbles that may appear in the resin once poured.
How to create Resin art in 9 easy steps
- Prepare your workspace with all the tools you’ll need and with safety precautions in mind. Remember to always experiment and patch test if you are unsure of the process. Cover the areas you don’t want the resin to seal on your support with masking tape. You can also prep the support with spray paint of an all-purpose sealer like this one by Jo Sonja
- Place the painting base on a raised surface (balanced on 4 plastic cups for example) so that the resin does not harden on the foil or newspaper below. Ensure that the painting surface is level (we’d recommend using a spirit level to be certain).
- Thoroughly mix the resin and hardener.
- For best results, mix the resin with fluid acrylic paints, sticking to a ratio of 1-part acrylic paint to 10 parts resin. You could also use powder pigments, Alcohol Inks (though be mindful this will make the resin highly flammable), as well as airbrush paint with a 1:10 ratio. You can use traditional pouring techniques like those used in acrylic pours such as the flip cup or swirl method, or simply pour the resin onto the support, but ultimately, it’s up to your imagination!
-
To create cell effects, add a silicone oil like the Mont Marte Acrylic Medium - Silicone Oil 60ml or the Helmar H4000 Silicone Oil 100ml to the resin. You can also add glitter, gold leaf or other mediums to create unique and stunning effects.
-
Move the resin around the painting surface with a knife, spatula, or foam roller or by tilting the surface.
-
7. If any bubbles occur, briefly apply a heat torch or hot air dryer roughly 10cm away from the surface to release the air pockets. You can also gently remove any foreign particles (like hair or dust) with tweezers.
-
8. Cover the work to protect it from dust and allow it to cure. Avoid exposure to extreme temperature fluctuations where possible.
-
9. Clean your tools with vinegar or isopropanol
How to seal a pre-existing artwork with Resin
While you cannot mix paints like oils or watercolours with resin, you can create artwork with these mediums, allow them to dry, and then varnish them with resin to seal in your creation. You can also sand back other dry resin works to then apply further resin layers.
-
First, you’ll need to prepare your workspace with all the tools you’ll need and the resin safety precautions in mind. You’ll also need to cover the areas you don’t want to be sealed on your artwork with masking tape.
-
Place the painting on a raised surface (balanced on 4 plastic cups for example) so that the resin does not harden on the protective foil or newspaper below, and ensure it is sitting level so that the resin can apply evenly.
-
Thoroughly mix the resin and hardener and pour it onto the painting, spreading evenly with a spatula, foam roller or knife.
-
If air bubbles form, heat the painting surface with a heat torch or hot air dryer swiped back and forth roughly 10cm away from the surface.
-
Let the curing process begin, and be sure to cover the artwork while it is drying to avoid dust from settling in the art. Any holes that occur in the resin may be due to not having used enough resin, or too much may have run off the surface.
-
Once finished, clean your tools with vinegar or isopropanol.

Enjoy creating your next Resin piece!
Remember here at Art Shed online we always love to see your creations so please tag us on Instagram @artshedonline or simply send us an email at customerservice@artshedonline.com.au with any questions, we are always happy to hear from you.
Comments (4)
Very useful.
By: Tanu L on 29 April 2023Hi..thank you for such a beautiful article...I love trying new art forms!
RESIN WONT SRY
By: Victoria on 4 January 2022Is humidity the reason my resin won’t dry I did equal part 1 and part 2 It is a coffee table so a larger piece than I normally do I have never had this problem before. My smaller pieces dried !
Resin Art
By: Elizabeth Osborne on 31 January 2021Thanks for this info. Would like a go at covering some art.
EXTRA TIPS On RESIN ART TO AVOID DISAPPOINTMENT
By: Ann Norman on 31 January 2021When preparing your dried artwork for resin, leave it at least a fortnight to dry for Acrylic to ensure that the paint has thoroughly cured. Then clean your artwork to remove any dust, finger marks or oil if you had used oil in your artwork. I use non purfumed "Baby Wipes" as these will remove oil traces. Then leave to dry. If you do not clean off the oil residue from you art surface you will end up with "holes" in your resin finish. This end result is very disappointing, but can be fixed by sanding the dried resin surface, cleaning and re resining the whole artwork. You cannot just do the holes as it will show. Resin self levels so will easily fill in the holes on the previous finish with the second coat. Hope this helps Ann Norman.