


What is Lino Printing? How It Works + Tips from Art Shed
Author: The Art Shed Team Date Posted:1 July 2025
.jpg.png)
Why Artists Love Lino Printing
Lino printing is making a huge comeback—and for good reason! It’s affordable, accessible, and ridiculously satisfying. Whether you’re printing on paper, t-shirts, calico bags, or even your own walls (yes, wallpaper is back, baby), lino is the versatile printmaking pal you didn’t know you needed.
It's beginner-friendly but still has depth for pros.
It’s reusable—one carving can create dozens of prints.
It’s great for personalising clothes, gifts, and home decor.
Artists even use lino in manga and animation—yep, lino printing has hit the big leagues!
What You Can Create With Lino
This isn’t just about block printing a flower and calling it a day. Here’s where lino printing shines:
Wallpaper That Wows
Wallpaper is having a renaissance—but ditch the overpriced designer rolls. Lino lets you stamp custom designs straight onto your wall, or onto a roll of paper for a removable version. Talk about a conversation starter!
Sustainable DIY Gift Wrap
Swap plastic-coated commercial wrap for stamped kraft paper. Print your own gift wrap with lino blocks—your presents will look so good you won’t want to open them.
Printed Clothing
Upcycle thrifted tees, totes, or even jeans with your own lino designs. Bonus: cut tiny stamps from erasers to create your signature logo or tag. Eco-friendly, unique, and just plain cool.
Cards & Prints for Sale
Market stall lovers, take note. Lino prints make beautiful greeting cards, framed prints, or handmade zine covers. You can turn one block into a full collection.
Textile & Fabric Decor
Print on napkins, tea towels, tote bags, or calico banners. Get some block ink, your fave lino stamp, and make your home look like a Pinterest board.
Legal Street Art
Create bold repeat patterns or signature icons and stamp them on boards, banners, or signs to spice up public art spaces—legally, of course.
Surf & Skate Culture
Seal your carved lino and use it to print artwork onto griptape, wooden panels, or even your surfboard! Great for custom boards, art comps, or that rad coastal vibe.
Small Biz Magic
Use lino to stamp your logo on swing tags, calico pouches, paper bags, or even signage. It’s handmade branding with that extra edge.
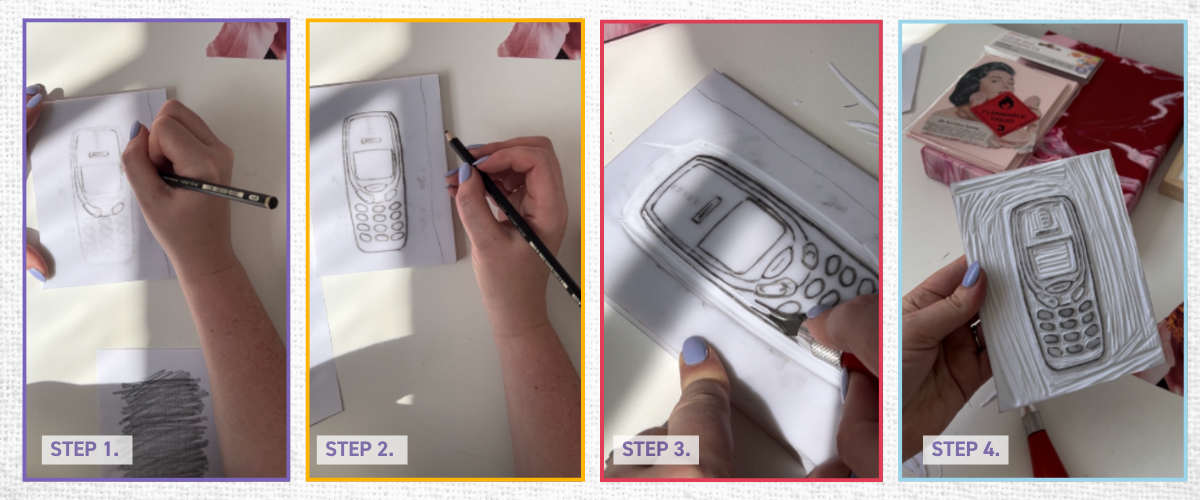
Step 1: Design & Transfer
Draw your design on paper (remember to FLIP it—it’ll print in reverse!). Too nervous to draw directly onto the lino? No stress. Just:
Draw it on baking paper or tracing paper.
Flip it onto your lino.
Rub with the back of a spoon or burnishing tool to transfer.
Step 2: Carve It Out
Use your lino carving tools (sharp ones only, blunt tools are your enemy). Start with outlining your design before scooping out the larger negative spaces.
Tips from the Shed
Use wood filler to patch mistakes.
Sharpen tools throughout the process.
Use a bench hook or safety guard to keep your hands safe.
Don’t rush. Lino rewards patience (and clean lines!).
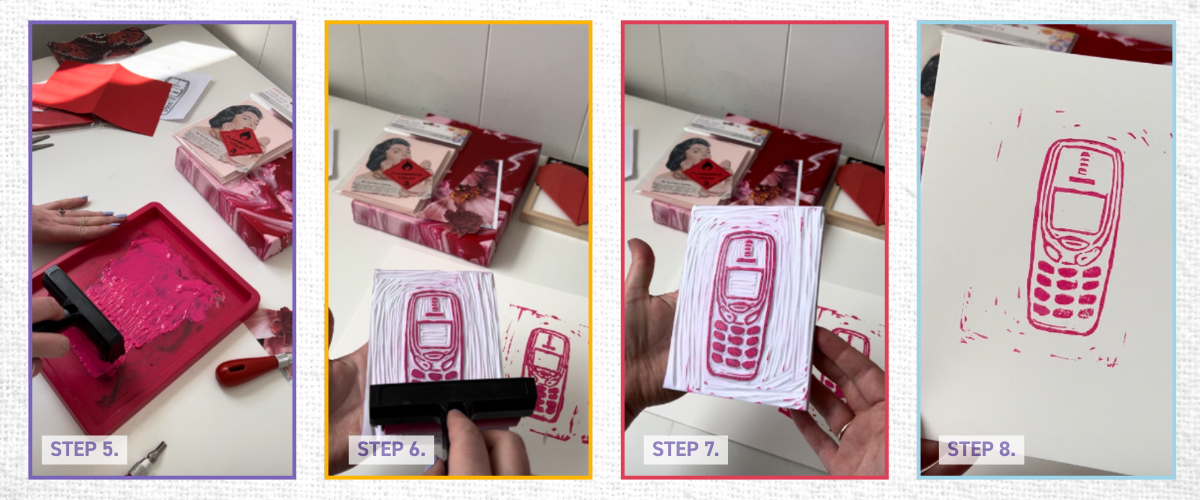
Step 3: Ink & Roll
Use a brayer (roller) to spread block ink evenly over your carving. Less is more—over-inking leads to gloopy prints.
Step 4: Press & Print
Lay your paper or fabric on top and use a baren, spoon, or press to apply pressure. No slipping allowed!
Step 5: Lift & Dry
Peel back the paper carefully and let your print dry completely. Frame it, wear it, sell it—your art, your rules.
What to Avoid (aka Lino Don’ts)
Forgetting to mirror your design.
Using blunt tools.
Over-inking.
Paper slip = smudge city.
Skipping block cleaning.

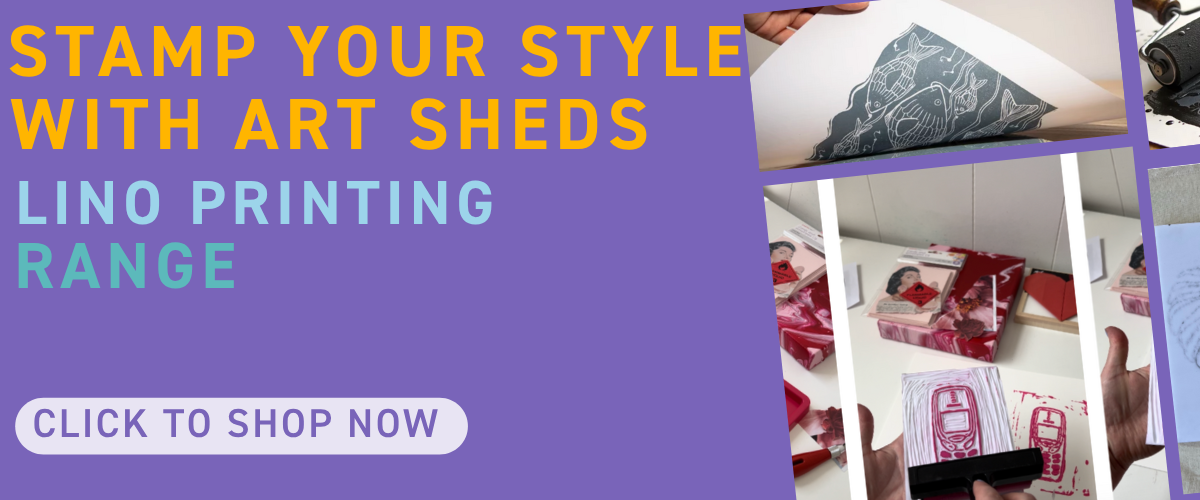
Product Picks Without the Overwhelm
You don’t need everything to get started—but we do recommend:
Lino blocks – Try Silk Cut or Renoir Ezy Carve
Ink – Derivan Block Ink in 250ml or 2L, water-based and vibrant
Rollers/Brayers – 50mm or 100mm depending on your design
Cutting Tools – Essdee kits, Mont Marte sets, or Japanese carving sets
Safety Tools – protective hand guards to prevent accidents
Inking tray - (trust us on this one)
Tip from the Shed: Watercolour Postcard Magic
Lino printing and watercolour postcards? A match made in arty heaven. Try printing your lino design onto watercolour postcards, then add a splash of colour with a wash or detail after it dries. It’s the perfect blend of bold print and delicate watercolour—and makes for a stunning, one-of-a-kind gift or art series!
All beginner-friendly, and all found right here at Art Shed. Click & Collect available or get it shipped fast across Australia!
.jpg.png)
FAQs – Answered Straight From the Shed
What is lino printing?
Lino printing, also known as linocut or linoleum art, is a printmaking method where you carve into a lino block, roll it with ink, and press it onto a surface to create an image.
How do I do a lino print at home?
Follow these steps: design → transfer → carve → ink → press → lift → dry. All you need is a flat surface, some tools, and block ink.
What’s the difference between linocut and lino printing?
Same thing! "Linocut" refers to the process; "lino printing" is the result.
What kind of ink do I need for lino printing?
Use block printing ink—like Derivan. It's water-based and ideal for paper or fabric.
Can I print with multiple colours?
Yes! Use the reduction method (carve more after each colour layer) or use separate lino blocks for each colour.
What is a reduction lino print?
A print that uses the same block for multiple layers by carving away more lino with each new ink colour.
Do I need special paper?
No, but smoother printmaking or watercolour papers give better results.
Is lino printing easy for beginners?
Absolutely! It’s simple to learn, low-cost, and forgiving.
How do I clean lino blocks?
Wipe with warm soapy water immediately after use—don’t let ink dry on the surface.
Tips from the Shed
Keep an eraser nearby as a mini lino block or to test carving pressure.
Use your carved lino block as a stamp on packaging or thank-you cards.
Try layering colours for dynamic multi-pass prints.
Use washi tape to hold your paper in place while pressing.
Don’t want to commit? Try stamp carving on smaller soft blocks first.
Keep your eyes peeled for in-store demos – we love showing you how it’s done!
Why Shop Lino Tools at Art Shed?
One of Australia’s widest ranges of lino tools
Click & Collect in Moorabbin
Fast shipping Australia-wide
Friendly help online or in-store
Got questions? Pop into store or message us online. We’re here with inky fingers and big ideas.
Interested in watching it in action? Check out our other artist-written blogs
Create your very own Lino Printed Calico Bag with us!