Oil Painting for Beginners: Complete Guide to Supplies, Techniques & Getting Started
Author: The Art Shed Team Date Posted:28 April 2026
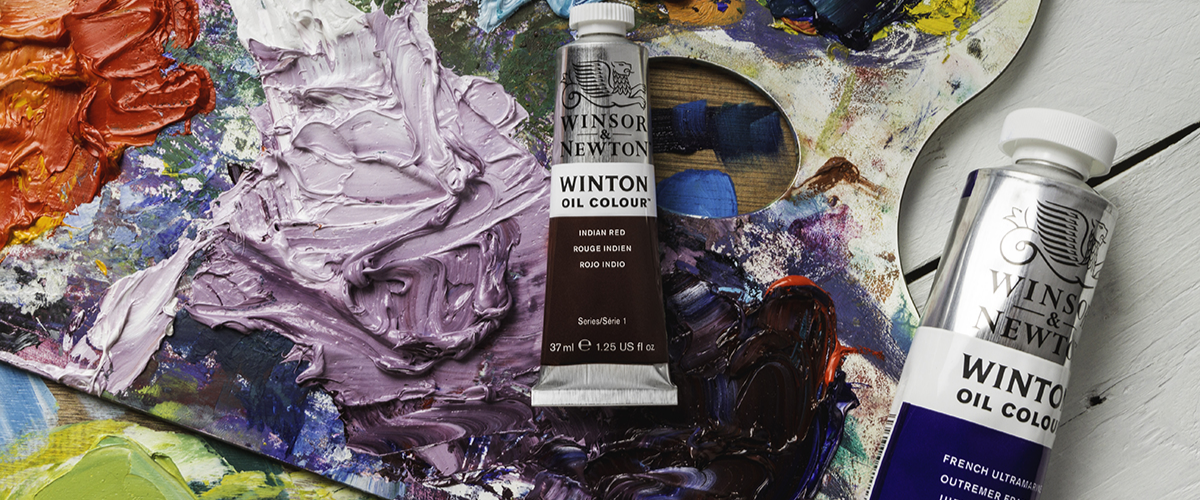
Oil painting is one of the most loved and timeless painting methods, known for its rich colours, smooth blending, and depth. If you’ve ever wondered how to start oil painting for beginners, what supplies you actually need, or how artists achieve those soft, realistic finishes, you’re in the right place.
A lot of people feel intimidated by oil painting at first. There’s a bit of a reputation around it being complicated or messy, but once you understand the basics, it’s actually one of the most forgiving and enjoyable mediums to work with. Unlike faster-drying paints, oils give you time. Time to blend, time to fix mistakes, and time to build your painting at your own pace.
In this guide, we’ll walk you through everything you need to know to get started. From what oil paint is and how it works, to the tools you’ll need, beginner-friendly techniques, and common mistakes to avoid. We’ll also help you understand which products are worth starting with, so you can build a setup that suits you without overcomplicating things.
Whether you’re completely new to painting or switching over from acrylics, this is your complete beginner’s guide to oil painting without the overwhelm.
What Is Oil Painting? (And Why People Love It)
Oil paint is, at its simplest, colour mixed with oil. The colour comes from pigment, and the oil, usually linseed oil, gives it that smooth, workable texture. This combination is what gives oil painting its signature feel and finish, and is why it’s often described as one of the most versatile traditional painting mediums.
Compared to other paints, oil paint is much thicker and richer. If you’ve used acrylics before, it can feel similar to a heavy-body or impasto acrylic, with that same buttery, slightly dense consistency that holds its shape and brushstrokes beautifully. It has enough body to create texture, but also enough flexibility to be smoothed out when needed.
Think of it like this:
If watercolour is like tea, and acrylic is like custard…
Oil paint is more like thick, creamy, butter cream.
The big difference is how it behaves once it’s on the canvas. Oil paint dries very slowly, which is exactly what makes it so loved. Instead of rushing to beat the clock, you’ve got time to move the paint around, soften edges, and blend colours directly on the surface. That slow drying time is what allows oil paintings to have those smooth, seamless transitions and soft, realistic finishes you often see.
Rather than locking in place straight away, the paint stays workable for hours, days, or even longer depending on how it’s used. This gives you the freedom to adjust, refine, and build up your work at your own pace, which is one of the reasons many beginners find oil painting more forgiving than they expect.
Another reason oil paint is so popular is how well it holds colour. The oil binder surrounds each pigment particle, which helps the colour stay rich and vibrant even as it dries. Instead of dulling down, colours tend to retain their depth, which is why oil paintings often have that luminous, almost glowing quality.
It’s essentially a slower, more flexible way of painting that gives you time, control, and strong colour payoff. Once you get a feel for it, it becomes a really enjoyable and intuitive medium to work with.
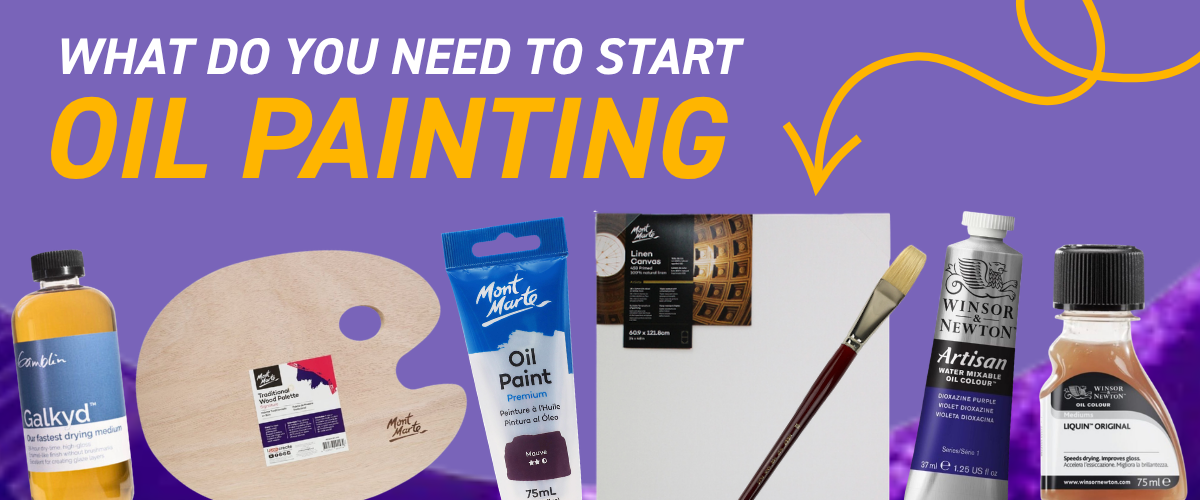
What Do You Need to Start Oil Painting?
Starting oil painting can feel like you need a full artist studio and a degree to match… but you really don’t. Once you understand what each thing actually does, it all becomes a lot simpler and way less intimidating.
Think of it like cooking. You don’t need every ingredient in the pantry to make something good, you just need a few solid basics and a feel for how they work together. Oil painting is exactly the same.
Oil Paints (Your Colour)
Your paints are the heart of everything, and this is where a lot of beginners get stuck overthinking. You don’t need every colour under the sun to get started. In fact, starting with a smaller palette will actually help you learn faster and improve your colour mixing.
A really solid beginner palette might include:
-
Titanium White
-
Ivory Black
-
Burnt Umber
-
Yellow Ochre
-
A warm red (like Cadmium Red)
-
A cool red (like Permanent Rose)
-
A warm yellow
-
A cool yellow
-
A blue (like Ultramarine)
This gives you a balance of warm and cool colours, which just means some lean slightly towards red/yellow (warm) and others towards blue (cool). Having both versions helps you mix cleaner, more natural colours. For example, a cool yellow mixed with blue gives you a much fresher green than a warm yellow would. It’s less about having more paint, and more about having the right paint.
In terms of how oil paint feels, it’s thick, smooth, and buttery. If you’ve used acrylic before, it’s closest to a heavy-body or impasto acrylic, but with more slip and movement.
When it comes to choosing paints, you’ll usually see a few different levels:
Beginner or introductory paints are designed to be really easy to pick up and just get going with. They’re more affordable, simple to use, and honestly the best way to get comfortable with oil painting without feeling like you have to get everything “right” straight away. Brands like Mont Marte or Reeves are perfect for this stage. And something a lot of people don’t realise is that even professional artists still use these paints. They’ll often use them for the first layers of a painting, blocking everything in, and then bring in their higher-end paints for the final touches. So starting here isn’t cutting corners, it’s actually how a lot of artists work.
Student-grade paints are kind of that sweet middle ground. They’re still affordable, but you’ll notice the colours feel a bit stronger and smoother to work with. They’re used by everyone from students to experienced artists who just need a reliable paint for everyday work. The Winsor & Newton Winton range is a really good example here, it’s consistent, easy to handle, and gives you that step up without making things complicated.
Then you’ve got intermediate paints, which sit nicely between student and professional. This is where you start to notice a bit more richness in the colour and a nicer feel when mixing.
Artist-grade paints are the top tier. They’ve got a really high pigment load, which means the colours are stronger, cleaner when you mix them, and just generally more vibrant. These are great when you’re working on pieces you really care about or want to last long-term.
Brushes & Palettes (How You Apply the Paint)
Brushes are how you actually move the paint around, and with oils being thicker, they matter a bit more than you might expect. The best oil painting brushes for beginners are usually firmer styles like hog bristle for shaping and moving paint, paired with softer synthetic brushes for blending and detail.
The two main types you’ll come across are:
Hog bristle brushes – these are firm and slightly coarse, perfect for pushing thick paint around and creating texture
Synthetic brushes – smoother and more flexible, great for blending and softer details
If you’re starting out, having a mix of both is ideal. Think of hog brushes like something you’d use to shape the paint, and synthetics for refining and softening it.
A few good starting brush shapes are:
Flat brushes – great for blocking in areas and bold strokes
Filberts – slightly rounded, really versatile for blending and general painting
Rounds – useful for detail and smaller marks
Fan brushes – nice for soft blending and subtle textures
Brands like Mont Marte and Neef have great starter options that feel good to use without being over the top.
You’ll also need a palette, which is just where you mix your colours. This can be:
Wood (classic and comfortable to hold)
Plastic (easy and low maintenance)
Glass (super smooth and easy to clean)
And a palette knife is one of those tools that ends up being more useful than you expect. It’s great for mixing paint cleanly, and also really fun for applying paint if you like that thick, textured look.
Surfaces (What You Paint On)
Oil paint needs a surface that’s been properly prepared so the oil doesn’t soak in and damage it over time. That’s why most painting surfaces are primed, meaning they’ve got a sealed layer ready to go and are suitable for oil painting surfaces like canvas or panel.
The most common options are:
Cotton canvas – affordable, slightly textured, and really forgiving
Linen canvas – smoother, stronger, and a bit more refined
Canvas pads – perfect for practice and getting comfortable
Panels (boards) – rigid and smooth, great for detail work
Cotton and linen are popular because they give you a really nice balance between texture and control. The paint sits on top rather than soaking in, which makes blending and layering much easier.
Most canvases you buy, including ranges like Mont Marte Artiste canvases, are already primed and ready to go. That priming layer (usually gesso) creates a surface that oil paint can properly grip onto without causing long-term damage.
If you’re just starting out, canvas pads or pre-primed canvases are honestly the easiest way to get going. No prep, no stress.
Mediums, Solvents & Extras (What You Might Add Later)
This is usually the part that feels the most confusing, but it doesn’t need to be.
A really common question is: do I need a medium, or can I just paint straight from the tube?
You can absolutely paint straight from the tube.
Mediums are there to change how the paint behaves, not to make it usable.
The most common one you’ll hear about is linseed oil. This just makes your paint a bit smoother and more fluid, and can give it a slightly glossier finish. It’s helpful, but not essential when you’re starting out.
As you get more comfortable, you might explore things like:
Faster drying mediums (to speed things up)
Glazing mediums (for thin, transparent layers)
Solvents are traditionally used to thin paint and clean brushes, but they’re completely optional for beginners. A lot of artists now prefer odourless or solvent-free setups, especially when painting at home.
Keep an eye out for our upcoming blog all about oil mediums and how to use them!
Cleaning & Care
Oil paint doesn’t rinse out with just water, so having something to properly clean your brushes makes a big difference.
You can use:
Brush cleaners
Artist soaps
(Optionally) solvents
Looking after your brushes early on means they’ll last you ages, and it makes the whole process feel a lot nicer.
TLDR
If you strip it all back, the essential oil painting supplies are:
Oil paints
A few brushes (hog bristle and synthetic)
A primed surface like cotton or linen canvas
A palette (preferably glass or wood)
Something to clean your brushes
That’s it.
Everything else can come later. The goal isn’t to have everything at once, it’s to start with something that feels manageable and build from there as you figure out what you enjoy.
.png)
The Beginners Oil Painting Kit
Perfect for first-time painters, curious creatives, or anyone wanting a simple, no-fuss intro to oils.
This kit keeps things approachable and easy to navigate, giving you a solid feel for how oil paint behaves without overloading you with options.
Mont Marte Oil Paint Set – 12pc x 12ml
A well-rounded starter palette covering essential colours for mixing. The smaller 12ml tubes are ideal for learning how colours interact without committing to large quantities, and the paint has a soft, workable body that holds brushstrokes while still allowing easy blending.
Mont Marte Gallery Series Paint Brush Set – Oil 5pc
Includes a mix of foundational shapes (typically flats, filberts, and rounds) so you can try different marks and techniques. The bristles are firm enough to move oil paint comfortably, helping you get used to how thicker paint responds to pressure and direction.
Mont Marte Mixed Media Pad A4 300gsm
A heavyweight paper that can handle light oil application without buckling. Great for early stages where you’re experimenting, practising brush control, or testing colour mixes before moving onto canvas.
Mont Marte Oil Medium – Refined Linseed Oil 125ml
A traditional oil medium that increases flow and extends working time. Adding a small amount helps the paint spread further and glide more easily across the surface, especially useful when you’re getting used to the thickness of oils.
Mont Marte Palette Knife (basic)
A flexible metal blade that allows you to mix colours cleanly without overworking them with a brush. It also gives you the option to apply paint in thicker, more expressive strokes.
Plastic Palette
A smooth, non-absorbent surface that keeps paint sitting on top rather than soaking in, making it easier to mix and reuse colours during a session.
.png)
The Student Oil Painting Kit
Ideal for art students, classes, or anyone building a consistent painting practice.
This set supports regular painting and colour exploration, with a wider palette and tools that feel comfortable to return to again and again.
Mont Marte Oil Paint – Titanium White
A high-use mixing colour in a larger format. White is used in almost every mix, so having extra ensures you can freely lighten colours and create tonal variation without holding back.
Winsor & Newton Winton Oil Paint Access Set – 20 x 12ml
A broad, balanced colour selection that opens up more mixing possibilities. The paint has a reliable, even texture that spreads well across the surface and allows you to explore layering, blending, and colour relationships more confidently.
Mont Marte Signature Paint Brush Set – Oil Hog Bristle 11pc
A full range of hog bristle brushes designed for oil painting. The natural bristles have a slight stiffness and “spring,” which helps move thicker paint while maintaining control, especially when blocking in shapes or building texture.
Art Spectrum Oil Paint Pad A4 300gsm
Specifically engineered for oil paint, with a sealed surface that prevents oil from soaking through. This allows paint to sit properly on the surface, making blending and layering much more consistent.
Winsor & Newton Liquin Original 75ml
An alkyd medium that improves paint flow and helps layers dry more evenly. Particularly useful when working over multiple sessions, as it reduces the wait time between layers without drastically changing the paint’s feel.
Mont Marte Studio Series Palette Knife Set 5pc
A range of blade shapes and sizes that allow for more controlled mixing and different application styles, from fine detailing to broader, textured marks.
Wooden Palette
A traditional option with a slightly absorbent surface, which helps “grip” the paint a little more during mixing and can feel more controlled over longer sessions.
.png)
The Advanced Beginners Kit
Great for painters who are getting comfortable with oils and want a setup that supports more time on the canvas.
This kit brings together materials that make it easier to refine your work and explore layering.
Winsor & Newton Winton Oil Colour Set – 10pc x 21ml
Slightly larger tubes give you more freedom to mix and paint without running out quickly. The colour range is carefully selected to support a wide variety of subjects, from landscapes to portraits.
Neef Red Series 140 Hog Bristle Brush – Filbert 4
A mid-sized filbert with a rounded edge that allows for both controlled strokes and soft blending, making it one of the most versatile brush shapes to work with.
Neef Red Series 140 Hog Bristle Brush – Flat 12
A wider brush suited to covering larger areas and laying down base layers efficiently, helping you establish compositions more quickly.
Mont Marte Gallery Series Paint Brush Set – Oil 5pc
Adds additional shapes to your toolkit so you can switch between broader strokes and finer work without constantly cleaning one brush.
Art Spectrum Double Primed Cotton Canvas Pad A4
Double priming creates a more even, sealed surface that supports smoother paint application and better adhesion.
Winsor & Newton Liquin Original 75ml
Helps paint settle evenly into the surface, making blending transitions and layering feel more controlled.
Chroma Incredible Brush Cleaner 250ml
Designed to break down oil paint effectively, helping maintain the softness and shape of your brushes after each session.
Wooden Palette
A stable and comfortable surface that supports longer painting sessions and more complex colour mixing.
.png)
The “Weekend Painter” Hobby Kit
Perfect for regular painters who enjoy coming back to oils and want a reliable, enjoyable setup.
This kit supports longer sessions and a wider range of techniques.
Mont Marte Oil Paint – Titanium White
A high-use mixing colour in a larger format. White is used in almost every mix, so having extra ensures you can freely lighten colours and create tonal variation without holding back.
Art Spectrum Oil Paint Set – 6 x 40ml
A focused selection of colours with a rich, workable body that responds well to both blending and layering techniques.
Neef Blue Series 1150 Hog Bristle Brush – Flat 8
Interlocked bristles help the brush maintain its shape over time, offering consistent performance across multiple paintings.
Neef Green Series 95 Synthetic Brush – Filbert 4
Softer fibres allow for smoother transitions and refined blending, particularly useful in later stages of a painting.
Art Spectrum Oil Paint Pad A3 300gsm
A larger working surface that allows you to explore composition and scale while still being portable.
Gamblin Galkyd Medium 250ml
An alkyd medium that helps paint flow while allowing you to build layers over shorter timeframes.
Gamblin Gamsol Odourless Mineral Spirit 500ml
A refined solvent with low odour, used for thinning paint or cleaning brushes in a more controlled way.
Palette Knife Set (5pc)
Encourages experimenting with thicker paint application and varied surface textures.
Wooden Palette
A familiar and dependable surface for mixing colours throughout longer sessions.
.png)
The Intermediate Kit
For painters exploring more detailed work, layering, and finishing techniques.
This set supports a more structured and considered painting process.
Winsor & Newton Artists’ Oil Colour 37ml (starter palette colours)
A carefully selected palette with high pigment concentration, allowing colours to retain their character even when mixed.
Art Spectrum Oil Paint Set – 9 x 40ml
Expands your palette while maintaining consistency across colours, useful for more complex compositions.
Neef Blue Series 1150 Hog Bristle Brush – Flat 5
Offers precise control for structured applications and controlled layering.
Neef Red Series 140 Hog Bristle Brush – Filbert 8
A reliable blending brush for shaping forms and softening transitions.
Art Spectrum Vegan Synthetic Brush – Rigger Size 6
A fine, pointed brush designed for line work, detailing, and finishing touches.
100% Linen Canvas (or canvas pad)
Linen fibres provide a stronger, smoother surface that supports detailed work and long-term durability.
Winsor & Newton Liquin Original 250ml
A larger format for consistent use across multiple works, helping layers dry evenly.
Gamblin Gamvar Picture Varnish (Satin)
A removable varnish that protects the surface and restores depth to colours once the painting is dry.
Chroma Incredible Brush Cleaner 1L
A larger volume for ongoing maintenance, keeping brushes clean and ready for use.
Wooden Palette
A stable, consistent surface for mixing and refining colour.
.png)
The “Studio Ready” Professional Kit
For painters building a full studio setup or working on long-term, finished pieces.
This kit supports a complete painting workflow from start to finish.
Winsor & Newton Artists’ Oil Colour 37ml (expanded palette)
A wider selection of colours with strong pigment presence, allowing for more nuanced mixing and colour control.
Art Prism Oil Paint 40ml
Adds variation and depth to your palette, with colours that respond well to layering and glazing techniques.
Neef Blue Series 1150 Hog Bristle Brushes (Flat 5, Flat 8, Bright 2)
Designed for durability and consistency, holding their shape through repeated use and heavier paint application.
Neef Red Series 140 Brushes (Filbert 8, Round 6)
A combination of shapes that support blending, shaping, and detail work across different stages of a painting.
Mont Marte Linen Canvas (stretched or pad)
A high-quality surface that supports both expressive brushwork and detailed layering.
Gamblin Galkyd Medium 500ml
Supports multi-layered painting by allowing paint to move and settle consistently.
Gamblin Gamsol Odourless Mineral Spirit 1L
A refined solvent suitable for studio environments, with controlled evaporation and low odour.
Gamblin Gamvar Picture Varnish (Matte or Satin)
Provides a protective finish while evening out surface sheen and enhancing colour depth.
Art Spectrum Stand Oil 100ml
A thicker oil medium that can be used to create smoother, more flowing applications and subtle gloss.
Da Vinci Vegan Brush Soap 85g
A gentle cleaning option that helps maintain brush shape and longevity over time.
Full Palette Knife Set
A complete range of tools for mixing, scraping, and applying paint in varied ways.
Wooden or Glass Palette
Choice of surface depending on preference, with glass offering a very smooth mixing experience and wood providing a more traditional feel.
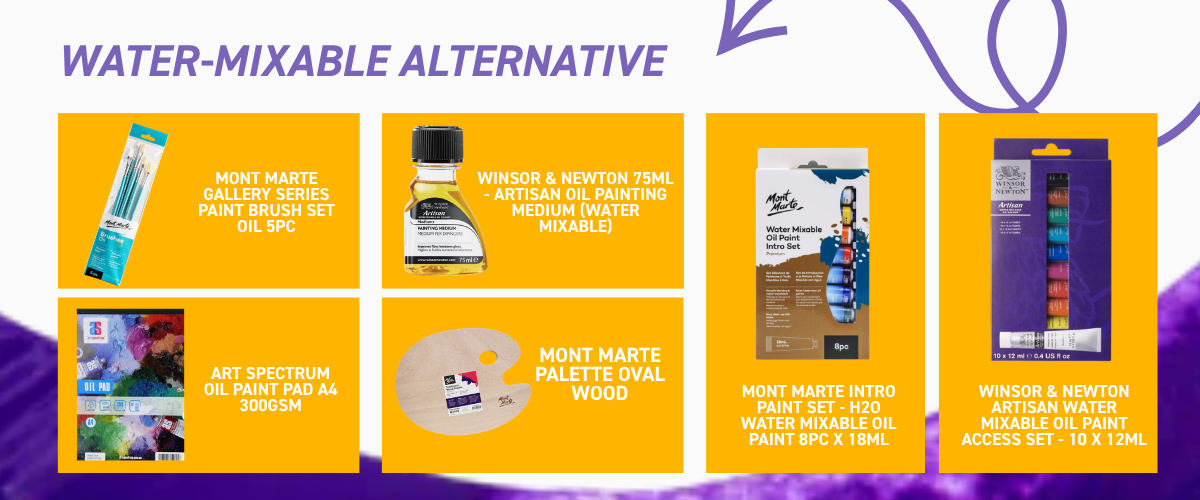
The Water-Mixable Oil Kit
Perfect for painters who love the look and feel of oils but want a simpler, lower-mess setup. Great for home studios, shared spaces, travel kits, or anyone wanting an alternative to traditional solvents.
Mont Marte Gallery Series Paint Brush Set – Oil 5pc
A practical starter brush set with a mix of shapes suited to oil painting. The firmer bristles handle thicker paint comfortably while still allowing smooth blending and layering.
Art Spectrum Oil Paint Pad A4 300gsm
A purpose-made oil painting surface with enough weight to support layering and blending. The sealed paper prevents oil absorption, allowing paint to sit properly on the surface while remaining portable and travel-friendly.
Winsor & Newton Artisan Oil Painting Medium 75ml (Water Mixable)
Designed specifically for water-mixable oils, this medium improves flow, blending, and workability while maintaining water clean-up. It helps loosen paint slightly without losing that classic oil painting feel.
Mont Marte Palette Oval Wood
A lightweight wooden palette that feels comfortable to hold during longer sessions. The smooth surface gives you plenty of room to mix colours while keeping your setup simple and portable.
Mont Marte Intro Paint Set – H2O Water Mixable Oil Paint 8pc x 18ml
A beginner-friendly introduction to water-mixable oils, with a balanced colour selection for learning colour mixing and basic techniques. The paint has a creamy consistency that behaves similarly to traditional oils but can be thinned with water.
Winsor & Newton Artisan Water Mixable Oil Paint Access Set – 10 x 12ml
A compact set of artist-quality water-mixable colours that offer strong pigment and smooth handling. These paints are ideal for painters who want the traditional richness of oils while keeping clean-up easier and more studio-friendly.
This kit is especially great for people painting at home, travelling, working in smaller studios, or simply wanting a gentler introduction to oil painting without relying on traditional solvents.
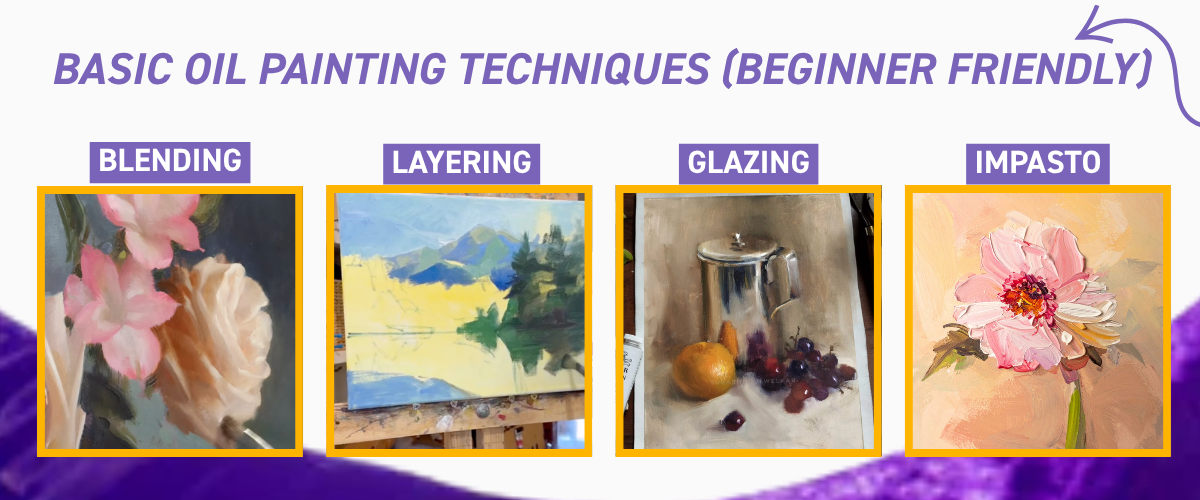
Basic Oil Painting Techniques (Beginner Friendly)
This is the part where oil painting really starts to feel like… painting.
You don’t need to master every technique straight away, but having a basic understanding of oil painting techniques for beginners will make everything feel more natural and a lot less frustrating. Oils are incredibly forgiving, so think of these techniques as tools you can come back to, not rules you have to follow perfectly.
Blending
Blending is one of the biggest reasons people fall in love with oil paint.
Because oils dry slowly, you’ve got time to blend oil paint smoothly, soften edges, merge colours, and create gradual transitions directly on the canvas. Instead of colours locking in place, they stay workable, which means you can gently push and pull them into each other.
A simple way to think about it:
Blending with oils is like softly smudging pencil, but with colour.
To blend:
- Lay two colours next to each other
- Use a clean (or lightly wiped) brush
- Gently move back and forth where they meet
You don’t need to press hard. Light pressure usually gives the nicest result.
A few things that help:
- Use a softer brush like a filbert or synthetic for smoother transitions
- Wipe your brush regularly so colours stay clean
- Avoid overworking the area, a few passes is usually enough
Blending is especially useful for skies, skin tones, shadows, and anything that needs a soft finish.
Layering
Layering is how oil paintings build depth and structure over time.
Instead of finishing everything in one go, you gradually build your painting in stages. This is often referred to as layering oil paint step by step, and it gives you more control as you refine your work.
The first step in layering is called blocking in.
Blocking in is where you:
- Map out your main shapes
- Place your base colours
- Focus on the overall composition rather than detail
Think of it like sketching, but with paint.
At this stage, keep things loose and simple. You’re just getting everything in place.
Do you start with lights or darks?
Most artists start with darker values first and build up to lights.
This helps establish contrast early, Give the painting structure and Make highlights stand out more later
A simple approach:
Block in darker areas
Add mid-tones
Finish with highlights
How many layers should you use?
There’s no fixed number, but most beginner paintings will have:
- A block-in layer
- One or two refining layers
- A final detail layer
So usually around 2–4 layers total.
Some artists paint in one session (alla prima), while others build their work gradually over time.
Important concept: Fat over Lean
This is one of the most important principles in oil painting.
It means:
Start with thinner, less oily paint
Gradually use thicker, more oil-rich paint on top
Following this helps prevent cracking and keeps your painting stable over time. It’s one of the key rules when learning how to layer oil paint correctly.
Glazing (Light Introduction)
Glazing is a technique where you apply thin, transparent layers of colour over dry paint.
Instead of covering what’s underneath, you’re adjusting it. This is known as glazing in oil painting and it’s often used to create depth and subtle colour shifts.
Think of it like:
Placing a coloured filter over your painting
The image underneath still shows through, but the colour changes slightly. Glazing is useful for Deepening shadows, Adjusting colour temperature and Creating that soft “glow” effect
To glaze:
Let your base layer dry
Mix a small amount of paint with medium
Apply a thin, transparent layer
You don’t need to focus on this straight away, but it’s a great technique to explore as you get more comfortable.
Impasto (Texture)
Impasto is where oil painting becomes more physical and expressive.
This technique involves applying oil paint thickly so the texture is visible on the surface.
Instead of smoothing everything out, the paint: Sits on top of the canvas, Holds brushstrokes and Catches light and creates dimension
Think of it like icing a cake, you’re building up paint so it has depth.
Impasto is often used for, Highlights, Texture like foliage or fabric and Adding movement and energy
To create this effect:
- Use paint straight from the tube
- Apply it with a brush or palette knife
- Let the strokes remain visible
Oil paint naturally holds its shape, which makes it perfect for this technique.
Bringing It All Together
When you combine these techniques, a typical beginner workflow might look like:
Light sketch (optional)
Block in shapes and colours
Build layers gradually
Blend where needed
Add detail and highlights
Finish with thicker paint or texture
You don’t need to use every technique in every painting. The goal is to understand what’s possible so you can start experimenting.
Oil painting isn’t about getting it perfect on the first go. It’s about building, adjusting, and gradually bringing something to life.
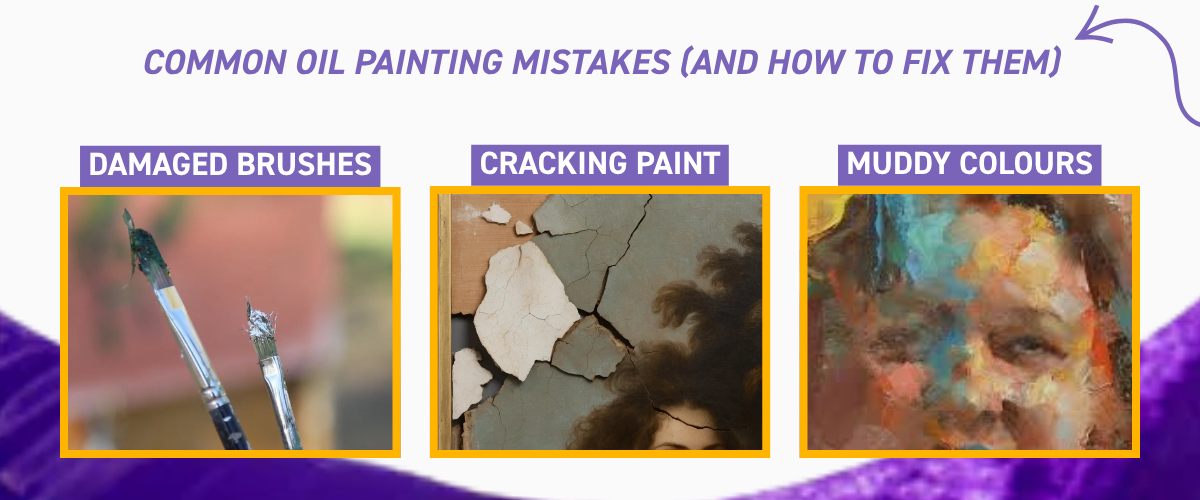
Common Oil Painting Mistakes (And How to Fix Them)
Every painter runs into these at some point, especially when starting out. The good news is that most oil painting “problems” aren’t actually mistakes, they’re just part of learning how the paint behaves. Once you understand what’s going on, they’re usually very easy to fix.
Paint Not Drying
One of the first things people notice with oils is that… they don’t seem to dry. You come back the next day and it’s still wet, sometimes even days later.
This isn’t something you’re doing wrong, it’s actually one of the defining features of oil paint.
Oil paint dries through a slow chemical process (not evaporation like acrylic), which means:
Thicker paint takes longer
More oil = slower drying
Cooler or more humid environments slow things down
The fix: work with it, not against it
A few simple ways to manage drying time:
Use thinner layers, especially in early stages
Add a small amount of a faster-drying medium (like an alkyd medium)
Paint in a well-ventilated, slightly warmer space
If you’re layering, it helps to think ahead. Let each layer become touch-dry before adding the next, especially if you’re working in multiple sessions.
And honestly, this slower drying time is a bit of a superpower once you get used to it. It gives you time to blend, adjust, and refine without rushing.
Muddy Colours
Muddy colours usually show up when everything starts turning a bit grey, dull, or lifeless instead of clean and vibrant.
This tends to happen when:
Too many colours are mixed together
Complementary colours (like red and green) are overworked
The brush isn’t cleaned between mixes
Blending is overdone
The fix: keep your colour mixing simple and intentional
A few easy habits that make a big difference:
Mix with fewer colours at a time (2–3 is usually enough)
Clean or wipe your brush between mixes
Let colours sit next to each other rather than over-blending everything
Use a palette knife to mix cleaner colours
Think of it like mixing food, if you throw everything into one bowl, it’s going to lose its clarity. Keeping things a bit more separated gives you fresher, more vibrant results.
Cracking Paint
Cracking can show up as small lines or breaks in the paint surface, sometimes appearing after the painting has dried.
This usually comes down to how the layers were built.
The most common cause is breaking the “fat over lean” rule:
Lean = less oil, thinner paint
Fat = more oil, richer paint
If you put a fast-drying, lean layer on top of a slower, oil-rich layer underneath, the top layer can dry first and start to crack as the layer below continues to move.
The fix: build your layers gradually
Start with thinner, less oily layers
Add slightly more oil (or medium) as you build up
Avoid jumping straight into thick paint over very thin layers
You don’t need to measure anything precisely, just keep the idea in mind:
each layer should be a little richer than the one before it
Ruined Brushes
Oil paint can be tough on brushes if they’re not cleaned properly. You might notice:
Bristles going stiff
Paint drying near the base (ferrule)
Brushes losing their shape
This usually happens when paint is left sitting in the brush or not fully removed after painting.
The fix: clean early and clean properly
A simple routine:
Wipe off excess paint with a cloth or paper towel
Use a brush cleaner or solvent to break down the paint
Wash with soap and warm water
Reshape the bristles and let them dry flat or upright
Try not to let paint sit in your brushes overnight, especially near the base where it’s hardest to remove.
A good brush, looked after properly, can last years, so it’s worth building the habit early.
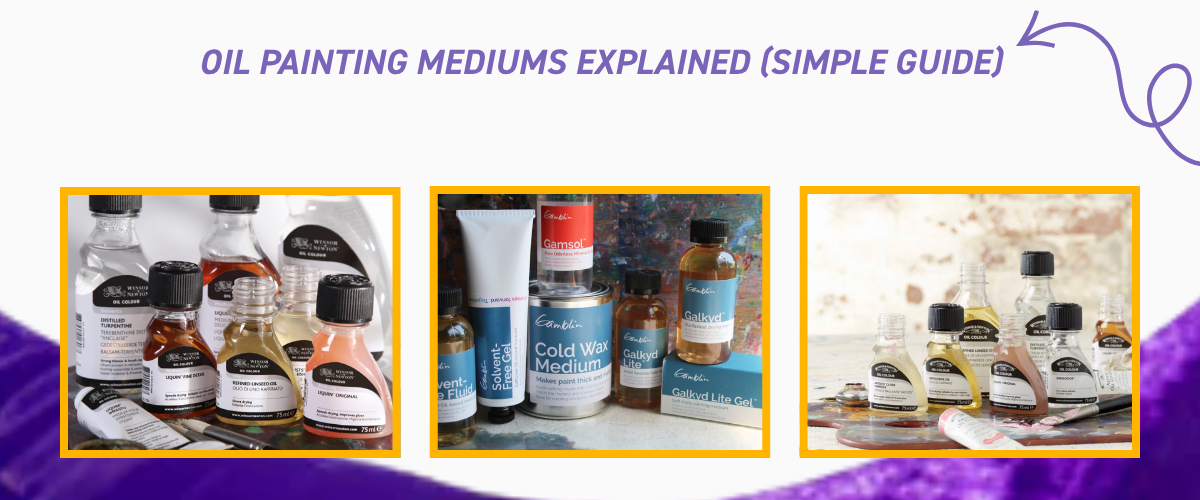
Oil Painting Mediums Explained (Simple Guide)
Mediums are one of those things that can feel a bit mysterious at first, but once you understand them, they’re actually quite simple and really useful.
At their core, mediums are just materials you mix into your paint to change how it behaves. That might mean helping it move more smoothly across the canvas, adjusting how quickly it dries, or changing how it looks once it’s dry. They don’t replace your paint, they just give you a bit more control over how it works.
You don’t need to use mediums straight away. Oil paint already contains oil, so it’s fully usable straight from the tube. Many artists paint this way for years. Mediums tend to come into the picture when you start noticing how the paint feels and want to tweak it slightly to suit how you like to work.
Linseed Oil (Flow & Workability)
Linseed oil is the most traditional oil painting medium and the one you’ll see come up the most.
It’s actually already inside your oil paint, it’s the binder that holds the pigment together. When you add a little extra, you’re just increasing that same property.
In practical terms, linseed oil:
- Loosens the paint slightly so it feels less stiff
- Helps it glide more easily across the surface
- Extends the drying time, giving you more time to blend
- Adds a subtle, natural gloss to the finish
Artist-grade options like Art Spectrum Refined Linseed Oil are designed specifically for painting and help maintain a smooth, consistent feel while you work.
A small amount goes a long way here. You’re not trying to dilute the paint, just soften it slightly so it moves the way you want it to.
Fast-Drying Mediums (e.g. Liquin)
If you’ve ever finished a session and realised your painting is still wet days later, fast-drying mediums can be really helpful.
Products like Liquin Original are designed to:
- Help paint dry more quickly
- Improve how it spreads across the surface
- Allow you to build layers sooner
Instead of waiting several days between layers, you can often come back much sooner and continue working. This is especially useful if you’re painting regularly or working on something in stages.
They don’t take away that classic oil paint feel, they just help keep your momentum going.
Solvents (What They Actually Do)
Solvents are often the most misunderstood part of oil painting.
Traditionally, they’re used for two main things:
- Thinning paint to create very light, wash-like layers (often in early stages)
- Cleaning brushes by breaking down oil paint quickly
You might come across names like mineral spirits, turpentine, or odourless solvents like Gamsol.
A helpful way to think about it is:
Oil = adds richness and flexibility
Solvent = reduces thickness and makes paint more “watery”
When used in painting, solvents are most commonly used in the very first layers, sometimes called an underpainting or wash, where you’re loosely blocking in shapes and tones. This is often where that “fat over lean” idea comes in, starting lean (with solvent) and gradually building richer layers on top.
That said, you don’t have to use solvents to paint. Many artists prefer to work without them, especially at home, using just paint and a small amount of oil or medium instead. Others like having them as part of their process for specific techniques.
If you do use solvents:
- Go for odourless options like Gamblin Gamsol
- Use them in a well-ventilated space
- Use small amounts rather than flooding your paint
They’re a tool, not a requirement, and how you use them really comes down to personal preference and how you like to paint.
The Simple Way to Think About It
If you zoom out, it becomes much easier to understand:
- Your paint gives you colour
- Your medium adjusts how that colour moves
- Your solvent (if you use one) helps you thin or clean
You don’t need to figure it all out at once. Most people start with just paint, then add something like linseed oil or a medium when they want a bit more flow, and explore solvents later if it suits their process.
It might seem like a lot now, but it clicks pretty quickly once you’ve had a play. We’ll dive deeper into all of this in a full oil mediums guide soon.
.

Oil Painting FAQs
Is oil painting hard for beginners?
Oil painting isn’t hard to start, but it does feel different at first. The slow drying time actually makes it easier for beginners because you can blend, fix mistakes, and adjust your work without rushing, unlike faster-drying paints like acrylic.
Do I need a medium to start oil painting?
No, you can paint straight from the tube. Oil paint already contains oil, so it’s fully workable on its own. Mediums like linseed oil or Liquin are optional and are used to adjust flow, drying time, or finish.
Can I paint without solvents?
Yes, you can paint without solvents. Many artists work solvent-free by using paint straight from the tube or with a small amount of oil or medium. Brushes can be cleaned with brush cleaner or soap instead of traditional solvents.
What’s the easiest oil paint to use?
Beginner-friendly oil paints like Winsor & Newton Winton and Mont Marte oil paints are some of the easiest to use. They have a smooth, consistent texture that spreads well, blends easily, and gives predictable results while you’re learning.
How do I stop oil paint from cracking?
To prevent cracking, follow the “fat over lean” rule by starting with thinner paint layers and gradually using thicker or more oil-rich paint on top. This allows each layer to dry evenly and keeps the painting stable over time.
What do I need to start oil painting?
To start oil painting, you’ll need oil paints, a few brushes (hog bristle for thicker paint and synthetic for blending), a primed surface like cotton or linen canvas or an oil painting pad, a palette for mixing colours, and brush cleaning supplies.
Can beginners use oil paint or should I start with acrylic?
Beginners can absolutely start with oil paint. Oils give you more time to blend and adjust your work, while acrylic dries quickly. It comes down to preference, but many beginners find oils more forgiving once they understand the basics.
How do you start your first oil painting?
Start by lightly sketching your subject, then block in large shapes and colours. Use thinner paint in the early layers and gradually build up to thicker paint as you refine the image. Finish by adjusting details and adding highlights.
How long does oil paint take to dry?
Oil paint usually takes 1–3 days to become touch dry, depending on thickness, colour, and environment. Thicker paint and added oils will slow drying, while thin layers and fast-drying mediums can speed it up.
What brushes are best for oil painting?
Hog bristle brushes are best for moving thicker paint and creating texture, while synthetic brushes are better for blending and detail. A combination of flats, filberts, and round brushes gives you the most flexibility.
What is linseed oil and do I need it?
Linseed oil is a natural oil used to make paint smoother and more fluid. You don’t need it to start, but adding a small amount can help paint spread more easily and extend your blending time.
Do I need a medium or can I paint straight from the tube?
You can paint straight from the tube. Mediums are optional and are used to adjust how the paint flows, dries, or looks, but they aren’t required for beginners.
What surface should I paint on (canvas vs panel)?
Oil paint works best on primed surfaces like cotton canvas, linen canvas, or panels. Cotton canvas is textured and forgiving, linen is smoother and more durable, and panels provide a firm surface for detailed work.
What are the essential supplies for oil painting?
Essential supplies include oil paints, brushes (hog bristle and synthetic), a primed surface such as canvas or an oil pad, a palette for mixing, and brush cleaning products. Mediums and solvents can be added later if needed.
How do you blend oil paint smoothly?
Blend oil paint by placing colours next to each other and gently working where they meet with a soft brush. Use light pressure and wipe your brush regularly to keep blends clean and avoid muddying the colours.
How do you layer oil paint correctly (fat over lean)?
Layer oil paint by starting with thinner, less oily layers and gradually adding thicker or more oil-rich layers on top. This helps prevent cracking and allows each layer to dry properly.
How do you mix colours without making them muddy?
To avoid muddy colours, mix only 2–3 colours at a time, clean your brush between mixes, and avoid over-blending. Using a palette knife can also help keep colours cleaner.
How do you create texture in oil painting?
Texture is created by applying paint thickly using a brush or palette knife. Oil paint naturally holds its shape, allowing you to build visible brushstrokes and raised surfaces.
How can I make oil paint dry faster?
You can make oil paint dry faster by using thinner layers, painting in a warm, ventilated space, or adding a fast-drying medium like Liquin.
Why do my oil paintings look muddy?
Muddy colours usually happen when too many colours are mixed together or when blending is overworked. Keeping your palette simple and cleaning your brush regularly helps maintain colour clarity.
Why is my oil painting cracking or peeling?
Cracking or peeling usually happens when layers are applied incorrectly. Following the fat over lean rule and allowing layers to dry properly helps prevent this.
Why won’t my oil paint dry?
Oil paint dries slowly by nature. Thick layers, added oils, and cooler environments can all extend drying time.
Why does my painting look flat or dull?
A painting can look flat if there isn’t enough contrast. Adding deeper shadows and brighter highlights helps create depth and bring the image to life.
Why do I struggle to finish paintings?
This is very common, especially for beginners. Many painters get stuck refining too early. Breaking your process into stages and focusing on finishing rather than perfecting helps you move forward.
Ready to Get Started?
Oil painting can seem like a lot at first, but once you break it down, it’s really just about learning how the paint moves, how colours interact, and giving yourself the time to enjoy the process. You don’t need a perfect setup, you don’t need every tool, and you definitely don’t need to get it right on the first go. Start simple, stay curious, and let each painting teach you something new.
The best way to learn oil painting is by actually doing it. Getting paint on the surface, trying things out, making a few mistakes, and figuring out what you enjoy along the way. That’s where everything starts to click.
And if you ever feel stuck or unsure, you’re not doing this alone. Our team of in-house artists are always more than happy to help, whether you pop into store for a chat, reach out to customer support, or send us a message on Instagram. We’re here to help you feel confident, supported, and a little bit excited to keep going.
So grab your kit, set up your space, and have a play. That first painting is always the hardest step, and also the most important one.