Alcohol Marker Techniques for Beginners
Author: The Art Shed Team Date Posted:29 September 2025
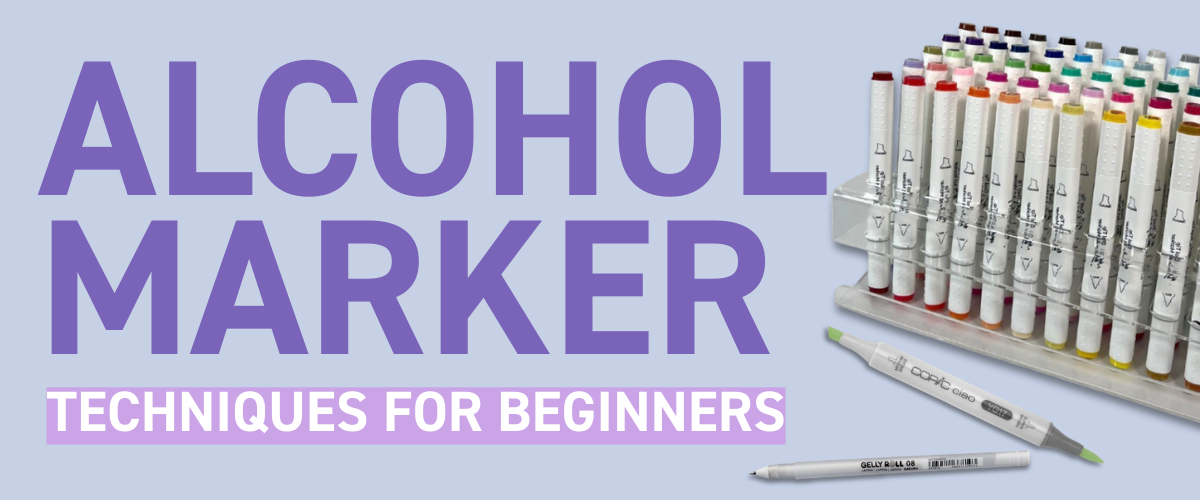
Alcohol markers are the secret weapon in every artist’s stash, bold, blendable, and way more versatile than your everyday texta. If you’ve ever wondered how to use alcohol markers beyond flat colouring, this is your sign to level up. In this guide, we are walking you through three beginner-friendly alcohol marker techniques that show off just how much these pens can do: a flowing water effect, a dusty gravel road, and a glowing fall tree.
You will learn how to layer, dot, blend, and highlight like a pro with Copic markers, Mont Marte Dual Tips, or any other markers you have on hand. The best part? These techniques do not need perfection; the messier, the better.
That is the beauty of alcohol markers: fast colour, smooth blends, and endless creative chaos.

Flowing Water Effect with Alcohol Markers
Step One: Choose your colours
First things first. grab your markers. I’m using Copic B41, Copic B12, Copic B21, and Copic B45 for this demo, but you don’t have to copy me shade-for-shade. All you need is:
One light blue (your base)
One slightly darker blue
One brighter, deeper blue
One dark navy-ish blue
You’ll also need a highlight pen for the finishing touches, a white Posca works great, but I’m using a Sakura Gelly Roll pen here as it gives me better control over smaller areas.
Step Two: Lay down your base
Pick up your lightest blue and colour in roughly half of your space. Keep the shape soft and organic, think waves, puddles, or big blobs. It doesn’t need to be perfect (in fact, the more natural the shape, the better).
Step Three: Add your second layer
Now take your slightly darker, muted blue and fill in the other half of the space. Don’t stress about crisp lines, we’re aiming for flow and movement, not rigid blocks of colour.
Step Four: Add bubble shapes
Switch to your brighter blue. On the lightest blue side, start drawing in organic shapes. little circles, oval “bubbles,” kidney-bean shapes, even wonky blobs. Keep them spaced out so they don’t all merge together. This is what starts to give your water that lively, flowing texture.
Step Five: Repeat with your darkest blue
Do the same on the muted blue side, this time with your darkest navy shade. Think of it as balancing out the light side with a bit of depth and contrast.
Final Step: Add highlights
Now for the magic. Take your white gel pen and layer over the top:
Add more loose organic shapes (squiggly lines, kidney beans, bubble outlines).
Dot in tiny highlights and sparkles around your blue shapes.
Touch up the edges of some bubbles to make them pop.
And that’s it! you’ve got a beautiful flowing water effect. Quick, easy, and seriously fun.
Tip from the Shed: Don’t overthink it. The best results come when you let the shapes stay loose and natural, water doesn’t follow straight lines, and neither should you.
Tip from the Shed:
If you’re working on a bigger area, you don’t have to split it neatly down the middle. Try mixing it up instead. add a patch of darker blue here, a sweep of lighter blue there, and let the colours overlap in a more random way. This creates a mash-up of tones that adds depth and movement, making your water effect look more natural and less planned out.
.png)
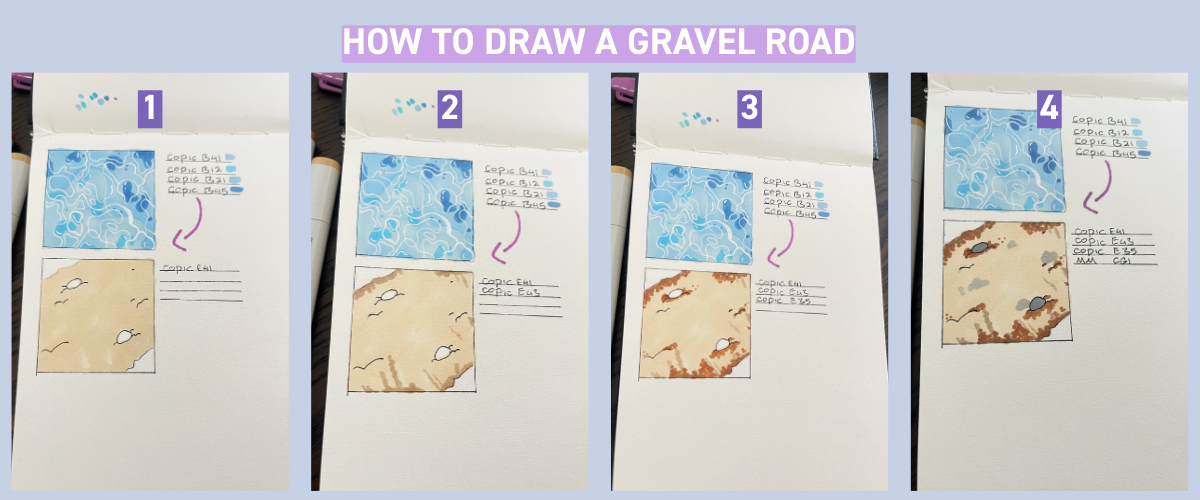
How to Draw a Gravel Road with Alcohol Markers
Step One: Pick your colours
Here’s what I used:
Copic E41 (light beige)
Copic E43 (darker beige)
Copic E35 (caramel)
Mont Marte Dual Tip CGI (light grey)
Copic N3 (dark grey)
Mont Marte Dual Tip 175 (green)
Mont Marte Dual Tip 93 (brown)
Sakura white highlight pen
But don’t stress about exact codes, here’s the basic recipe:
One light beige
One darker brownish beige
One caramel brown
One light grey
One dark grey
One green
One brown
And a white highlight pen to finish it off.
Step Two: Map your road
Lightly sketch or imagine the shape of your road. Fill it in with your light beige marker, this gives you a nice base coat to work on.
Step Three: Add dirt textures
Dot in some random blobs around the edges of the road. From there, add in a few shaky, organic lines that creep inwards toward the centre. This starts to break up the flat colour and make it look more natural.
Step Four: Layer in caramel tones
Grab your caramel brown and dot over those edges, building up little patches of dirt. Use the same colour to suggest clumps of kicked-up soil under rocks or spots where the road is worn.
Step Five: Draw in the rocks
With your light grey, add a few organic rock shapes around the dirt patches. Don’t overthink it, little lumpy ovals, uneven blobs, and some tiny dots for scattered pebbles will do the trick.
Step Six: Shade the rocks
Take your dark grey and shade one side of each rock. Keep it messy, this is what makes them feel more natural and less “cartoon perfect.”
Step Seven: Add grass details
Using your green marker, draw a few little tufts of grass. I just did three quick upward strokes near rock clusters and dirt patches, but you can add as much as you like.
Step Eight: Deepen the dirt
Switch to your darkest brown and go over the dirt areas you’ve already built. Add more dots around the rocks and scatter a few darker patches throughout the road for extra texture.
Step Nine: Highlight the details
Finally, take your white highlight pen. Add messy highlights on the unshaded side of the rocks to give them dimension. Dot a few highlights on pebbles and even some grass tips to bring the whole scene to life.
And there you have it, a cute, easy, and wonderfully messy gravel road effect. Perfect for backgrounds, landscapes, or just practising your marker textures.
Tip from the Shed: If you’re working on a larger area, don’t be afraid to mix it up. Instead of colouring the whole road evenly, scatter patches of darker beige and grey here and there. The more variety you add, the more depth and realism your gravel road will have. You can also experiment with perspective and make the rocks and grass taller closer to you, and smaller further away from you.
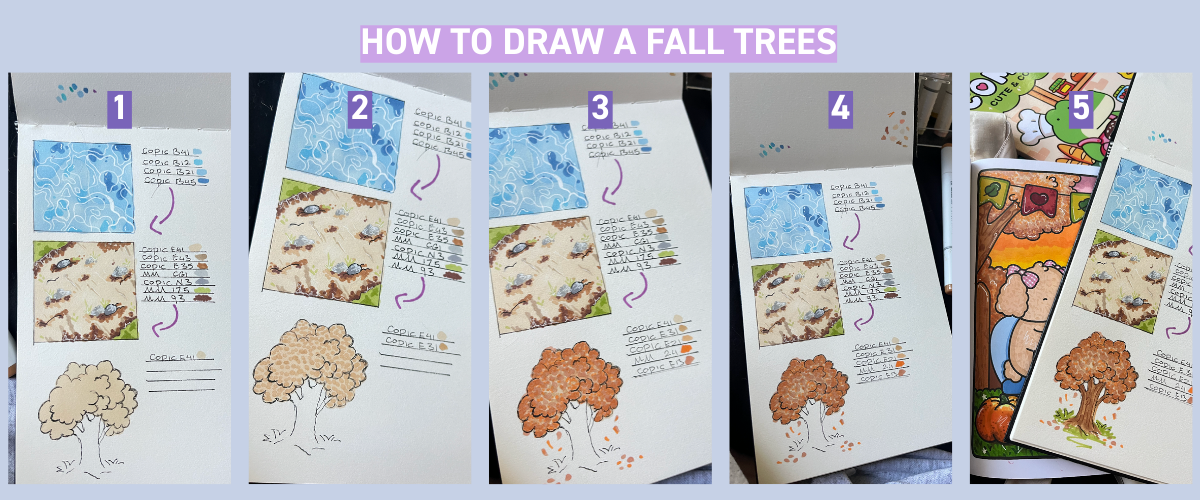
How to Draw a Fall Tree with Alcohol Markers
Step One: Choose your markers
Here’s what I used:
Copic E41 (light beige)
Copic E31 (darker beige)
Copic E21 (orangey beige)
Mont Marte 24 (bright orange)
Copic E13 (dull brownish orange)
But don’t worry if you don’t have these exact ones, you’ll just need:
One light beige
One darker beige
One orangey beige
One bright orange
One dull, brownish orange
This mix will give you that glowing, layered autumn look.
Step Two: Lay down the base colour
Fill in the entire tree canopy with your light beige. This gives you a soft, neutral foundation so the brighter autumn tones really pop later on.
Step Three: Add depth with your second beige
Dot in your darker beige across the tree, leaving small gaps between your dots. This layering starts to create variation and texture, like clusters of leaves.
Step Four: Bring in the orange tones
Grab your orangey beige and dot around the edges of the leaf clusters. Focus especially near the outline of the tree and around any branches, apples, or other details poking through. You can scatter a few dots in the middle of the canopy too, but keep most of the colour near the edges for a glowing effect.
Step Five: Brighten it up
Now take your bright orange and repeat the same step, but this time, let more of the dots scatter across the middle. This is what makes the tree look full of movement and colour, as if the light is hitting it from different angles.
Step Six: Add contrast with the darkest tone
Finally, use your dull brownish orange to deepen the edges. Keep most of these dots right along the outer shape of the tree. This creates shadows and makes the canopy feel more three-dimensional.
Step Seven: Finish the details
Use your darkest shade to colour in any visible branches. You can also dot a few scattered leaves falling from the tree to really sell that autumn vibe.
And that’s it. You've got yourself a warm, textured fall tree that feels full of life. Perfect for seasonal scenes, backgrounds, or just practising layering and dotting techniques with your markers. (yes i forgot to take pictures of every step shhh)
Tip from the Shed: Don’t stress about perfectly even dots. The best autumn trees are a bit chaotic colours overlapping, clusters heavier in some spots, lighter in others. That randomness is what makes it feel real.
.jpg.png)
FAQs: Alcohol Marker Techniques
1. What are alcohol markers and how are they different from regular markers?
Alcohol markers use dye ink suspended in alcohol, which dries quickly, blends smoothly, and layers without streaks. Unlike water-based markers, they give professional, vibrant results.
2. What paper should I use with alcohol markers?
The best paper is bleedproof marker pads or heavyweight smooth paper, which stops feathering and ink bleed. Avoid printer paper, as it soaks up ink and dulls your colours.
3. Are alcohol markers beginner-friendly?
Yes, they’re easy to pick up with simple techniques like layering, dotting, and flicking. Imperfections actually add to the effect, making them forgiving for beginners.
4. How do you blend alcohol markers smoothly?
Work from light to dark shades while the ink is still wet, overlapping strokes to merge the colours. A colourless blender pen can also soften transitions and create smooth gradients.
5. Can I mix different brands of alcohol markers?
Absolutely, Copics, Mont Marte, and other alcohol markers blend together without issue. The key is choosing complementary colours, not sticking to one brand.
6. Why do alcohol markers bleed through paper?
It’s natural because of their alcohol base. Always use bleedproof paper or place scrap paper underneath your work to protect the next page.
7. How do I create textures like water, gravel, or trees with markers?
Use organic dotting, layering, and scattered strokes with light and dark shades. For example, bubbles and dots create water, while uneven dots and strokes mimic gravel or leaves.
8. Can I use alcohol markers with other art supplies?
Yes, they pair well with fineliners, coloured pencils, and gel pens. White pens are especially handy for highlights, sparkles, and finishing details.
9. Do alcohol markers fade over time?
Like all inks, they can fade if left in direct sunlight. Using high-quality paper and storing finished work away from UV light helps preserve colours.
10. How do I stop streaks when colouring large areas?
Colour in consistent strokes and keep the ink wet by overlapping edges. Working quickly and using lighter shades first also reduces visible streaking.
11. What is a colourless blender and how do I use it?
A colourless blender isn’t for erasing, it’s for pushing ink, softening edges, and creating highlights or gradients. It’s a key tool once you move past the basics.
12. Are alcohol markers refillable?
Many professional brands like Copics are refillable, letting you replace ink and nibs for long-term use. Budget-friendly markers aren’t refillable but can still last with proper care.
Wrapping Up
And there you go , three easy alcohol marker tutorials that prove these pens are more than just fancy felt-tips. You’ve seen how to create realistic textures like shimmering water, earthy gravel, and glowing autumn leaves just by layering a few colours and letting the markers do the heavy lifting. (Yes, I did forget to snap photos of one step on the fall tree, but hey, we’re not robots. That’s real art, real chaos, real Art Shed.)
If you’re just starting out, don’t overthink it, grab a few shades, keep your strokes loose, and let the colours blend themselves. If you’re more advanced, try scaling these ideas into full scenes or mixing in other mediums like fineliners or pencils. And remember, good tools make good art easier: a stash of alcohol markers, bleedproof paper, and a white gel pen will take you far.
Shop the full range of alcohol markers and supplies at Art Shed — because no artist deserves a boring stash.
PS: This is just the start of our alcohol marker adventures. Next up in the series, we’ll dive into how to properly blend alcohol markers and finally answer the big question every beginner asks: what in the shed is that colourless blender even for?