


How to Make a Sculpted Ghost Painting for Halloween
Author: The Art Shed Team Date Posted:16 September 2025

No art degree? No drama. This Halloween trend has officially escaped TikTok and entered the spooky season must-do list.
You’ve probably seen them, those sculpted little ghost paintings on moody black canvases, thick with texture and full of haunted charm. Once a pricey pick in fancy home décor stores, they’ve become the ultimate DIY Halloween art project. Minimal, a bit eerie, and way too fun to pass up.
The best part? You don’t need a studio or a big budget to get amongst it. With a few simple supplies from Art Shed, you can whip up your own textured ghost painting for under $25.
Whether you’re decking out your walls with spooky décor, making a handmade Halloween gift, or just feeling a bit witchy with your art supplies, this one’s for you.
What is the Ghost Painting Trend?
It all started with a mass-produced canvas—matte black background, thick white ghosts sculpted in modelling paste, and a $70 price tag that made everyone do a double take.
The vibe was there though: textured, spooky, and kind of cute in a weird little way.
So the internet did what it does best—made it better (and cheaper). Artists and DIYers started whipping up their own versions, adding metallics, glitter, tiny hats... you name it. Whether you go minimal or full haunted disco, the magic recipe stays the same: sculpted texture + moody canvas = a Halloween DIY that actually looks like art.

What You'll Need
You can get all of this at Art Shed (or sub in a few household basics if you're in gremlin mode):
Modelling paste (Mont Marte Modelling Paste works well)
Palette knife or any sturdy spatula
White and black acrylic paint or paint pens
Optional: Sealant, glitter, stars, or accessories
How to Make a Ghost Painting
.png)
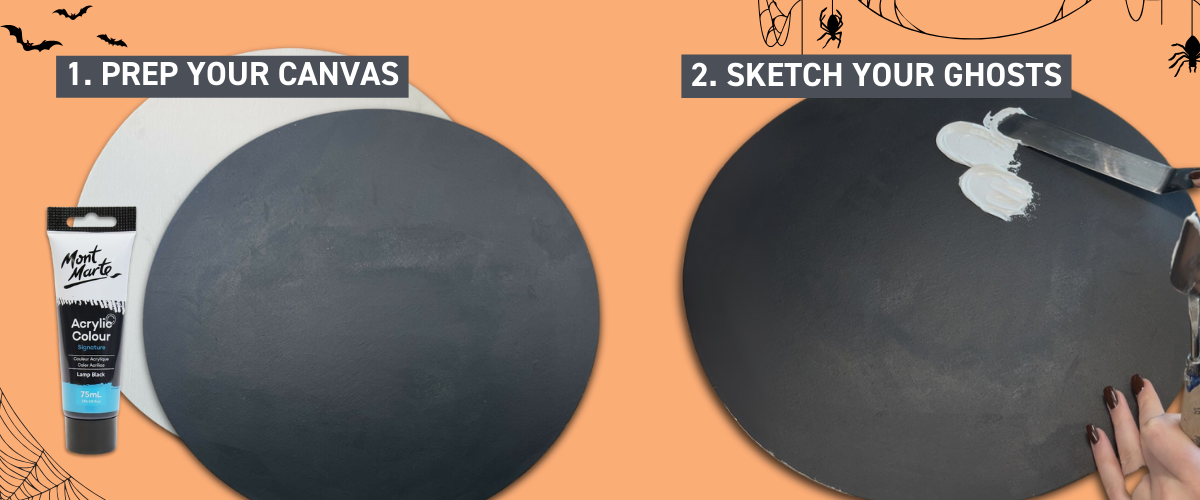
Prep your canvas
If your canvas isn’t already black, coat it with matte black acrylic and let it dry completely.
Sketch your ghosts
Lightly outline where you want your ghosts to sit. Keep the shapes simple—oval blobs or teardrops work best. You can add arms or movement with curves if you're feeling extra.
Apply the modelling paste
Using your palette knife, build up your ghosts with thick, sculptural strokes. Texture is your friend here—the more dimensional, the better. Let them fully dry before moving on (this might take a few hours or overnight).
Tip from the Shed: Don’t overwork the paste. It’s meant to look a little rough and organic.
Add the eyes
Use a fine brush or paint pen to dot on the eyes once your ghosts are dry. Small black dots give them character—spaced apart for a softer look, close together for a bit of sass.
Seal and decorate (optional)
Seal with a clear spray varnish if you want it to last. You can also add details like stars, glitter, or tiny accessories if you want to lean into the fun.
FAQs about Modelling Paste & Texture Art
How long does modelling paste take to dry?
Drying time depends a lot on how thick the paste is, the air temperature, and the humidity. Thin layers might dry within a few hours; thicker, sculpted parts can take 24 hours or more. If you're impatient, you can use a fan or low‑heat hairdryer to speed it up (but gently).
Do I need to prep my canvas before using modelling paste?
Yes. A stable, rigid surface works best (canvas with a stronger frame, board, or panel). You can also apply a base layer of acrylic paint if you want a coloured background. Make sure it’s clean and dry. Also, thicker paste is heavy, so stretched canvas should be tight.
What can I use instead of modelling paste?
Alternatives include gel medium (less texture), wall putty or spackle for texture, or heavy modelling clay/paper clay for sculptural effects. Just note: many alternatives won’t hold sculpted 3D forms as well or may crack if painted over too early.
How do I use a palette knife with modelling paste?
Scoop up paste with the flat side of a palette knife, then spread or build peaks. You can use the edge for lines or texture. Experiment with pressure, angle, and motion (scraping, sweeping, dabbing). Clean your knife right after use while paste is still wet—once it dries it’s harder to remove.
Will modelling paste crack if I apply it too thickly?
It might. Thick layers can shrink or crack as they dry, especially if drying is too fast or uneven. Best practice: build up in multiple thinner layers, giving each layer enough time to dry before adding more.
Can I paint directly over modelling paste, or mix paint into it?
Both are possible. You can let the paste dry fully then paint over with acrylics. Or you can mix acrylic paint into the paste while wet to colour it directly. Just remember: the white base of paste may alter colour tones and dry time.
What surfaces are best for modelling paste?
Rigid, strong surfaces work best: thick canvas, wooden boards, Masonite, or any surface that won’t bend under the weight of paste. Avoid flimsy paper or stretched canvases that are too loose.
How thick can I apply layering of modelling paste safely?
Try not to go thicker than about 1 cm in a single application, depending on the brand. If you want a heavy texture, build up gradually in layers. This helps avoid slow drying, sagging, or cracking.
Does the modelling paste change the look of paint when painted over?
Yes. Because modelling paste is often white and textured, once dry it can affect brightness, colour saturation, and how paint looks over it. Painted over dried paste, you might need more pigment or coats. Also texture shadows can change perception.
How do I seal or protect a modelling paste artwork?
After your paste is dehydrated and you’ve painted it, use a clear varnish or sealant spray if you want protection from dust or touch. If you’re embedding decorative elements (glitter, stars), sealing helps keep them in place. Ensure that the seal is compatible with acrylic surfaces. (Also, avoid sealing too soon.)

Share Your Ghosties
If you make one, tag us @ArtShedOnline. We’d love to see your version. Whether your ghosts are creepy, cute, moody or glam, they deserve their moment.