5 Common Beginner Art Mistakes (and How to Fix Them)
Author: The Art Shed Team Date Posted:3 February 2026
If you’ve ever stared at your artwork thinking “I swear this looked better five minutes ago”, congrats, you’re officially doing art. That weird, slightly offensive moment where everything goes muddy, flat, or just… wrong isn’t a personal failing. It’s a rite of passage.
Beginner artists don’t struggle because they “lack talent”. They struggle because there are a few sneaky fundamentals no one explains early enough. Things like overblending acrylic paint until the colour loses its strength, relying on black for shading instead of building depth through colour, or jumping into fine details before the underlying structure is properly planned. Add in the very human habit of drawing from memory rather than observation, and it’s easy to see why things can start feeling frustrating.
The good news is these mistakes are incredibly common and completely fixable. We see them in the Shed every day, and once you know what to look for, everything starts clicking a whole lot faster. Below are the five most common beginner art mistakes, plus practical fixes that’ll save you time, frustration, and more than a few “why did I do that” moments.
Why Are My Acrylic Paint Colours Turning Muddy?
Beginner Mistake: Overblending Acrylic Paint
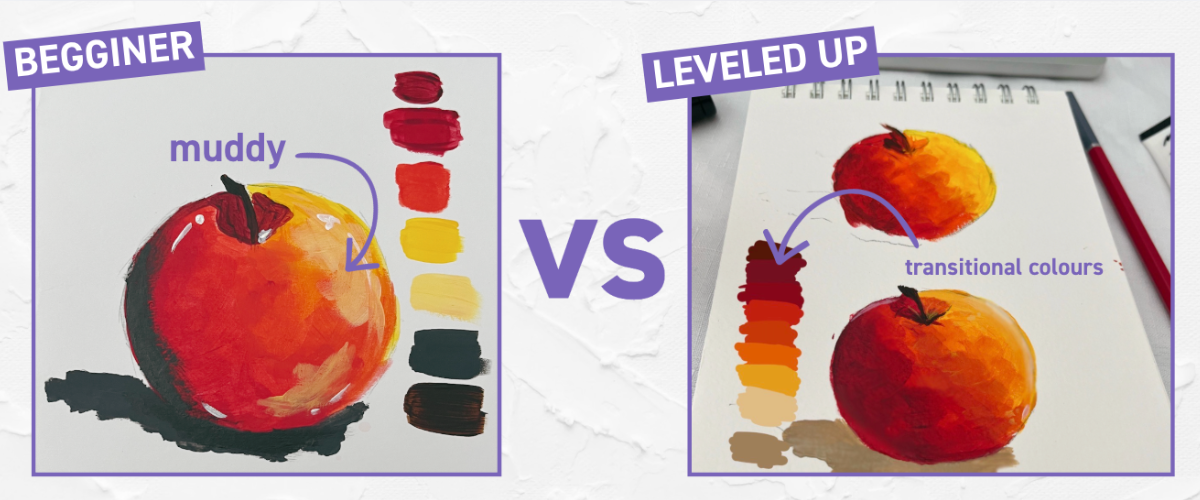
If your acrylic painting suddenly looks dull, grey, or “overworked,” overblending is almost always the culprit. Acrylic paint dries quickly, which makes it tempting to keep smoothing, fiddling, and pushing colours together until everything loses its punch.
When acrylics are overblended, the pigments physically break down and mix into each other too thoroughly. Instead of clean transitions between colours, complementary pigments combine into a neutral, muddy tone. The more you work wet-on-wet without a plan, the faster colour clarity disappears.
The fix: Use multiple transitional colours instead of forcing two colours together.
Rather than blending Colour A straight into Colour C, introduce one or more transitional colours between them. For example, if you’re moving from a warm yellow into a cool blue, pushing them together directly on the canvas almost guarantees mud. Instead, pre-mix or lightly layer a green transition, then adjust the temperature and value gradually. Think of it as stepping stones rather than one big jump.
Tips from the Shed for cleaner acrylic blends:
Mix your transitional colours on the palette first so you know exactly where you’re heading
Work in smaller sections to avoid fighting fast-drying paint
Let layers dry and glaze over them instead of endlessly reworking wet paint
Use a soft flat or filbert brush and clean it regularly while blending
Clean, vibrant colour comes from intentional transitions, not from blending everything until it behaves.
.png)
Why Does My Shading Look Flat or Dirty?
Beginner Mistake: Shading With Black Instead of Darkening the Base Colour
If your shadows are making your artwork look flat, dull, or lifeless, it’s often because black paint is doing all the heavy lifting. Reaching for black feels logical. Dark equals shadow, right? Unfortunately, straight black tends to kill colour vibrancy and collapse depth, especially in beginner paintings.
In real life, shadows aren’t actually black. They’re cooler, richer, and still connected to the original colour of the object. When black is used on its own, it removes that relationship entirely, which is why shaded areas can feel heavy or disconnected rather than dimensional.
The fix: Darken colours using a controlled shadow palette instead of black.
Rather than adding black, build shadows by modifying your base colour. This keeps your painting cohesive and your colours alive. You can darken a colour by adding:
A complementary colour to neutralise it without deadening it
A darker version of the same hue to maintain colour harmony
A cool blue or violet to create natural shadow depth
Burnt umber or Payne’s grey for warmth and control
A beginner-friendly shadow palette from the Shed might include:
Ultramarine blue
Burnt umber
Alizarin crimson or a deep red
A warm yellow
Titanium white (used sparingly, mainly for value control)
To work out where shadows actually belong, try squinting at your reference image. This softens details and reveals the underlying value shapes. Notice where light stops hitting the form, where mid-tones live, and where the darkest accents naturally fall. Shadows follow the shape of the object, not the outline.
If it helps, imagine wrapping cling film tightly around the object. The shadows curve and wrap with the surface, they don’t sit flat or cut straight across.
Why Do My Drawings Look Disproportionate or Flat?
Beginner Mistake: Going Into Detail Too Early
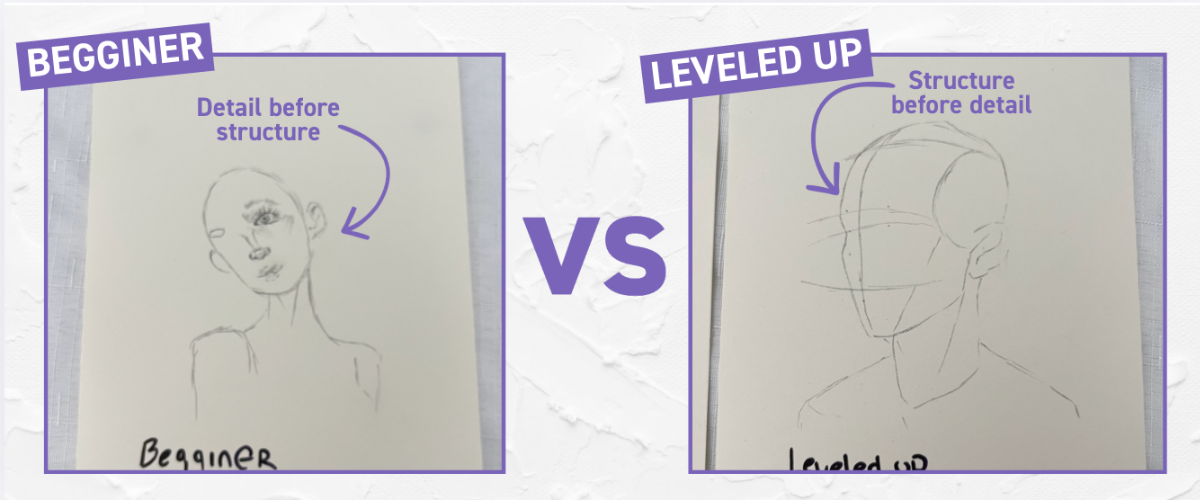
If your drawings feel off even though you’ve added plenty of detail, it’s often because the proportions and structure weren’t fully worked out first. This is one of the most common reasons beginner drawings look disproportionate or flat, especially in portraits. You might have a beautifully rendered eye or carefully shaded lips, but the head shape is slightly wrong or the features aren’t sitting in the right place, which throws the whole drawing out.
Detail doesn’t fix proportion or depth issues. It actually locks them in. Once something is heavily rendered, it becomes much harder to adjust spacing, alignment, or form, even when something feels wrong.
The fix: Build structure first, then earn the details.
Before committing to fine detail, focus on mapping the subject lightly and accurately. Early stages should be about placement, spacing, and proportion rather than texture or polish. This is where depth and realism are built, long before shading or eyelashes come into play.
Helpful beginner techniques for reducing flatness and fixing proportion issues include:
Blocking in the subject using simple shapes and basic geometry
Measuring proportions by comparing distances with your pencil
Drawing centre lines, eye lines, and alignment guides before adding features
Keeping early lines loose, light, and easy to erase
When the foundation is solid, details naturally sit in the right place and the drawing gains depth. When it’s not, adding detail just makes the problem louder and harder to correct.
Think of it like building a house. You don’t install the light fixtures before the walls exist.
Why Doesn’t My Drawing Look Like the Reference?
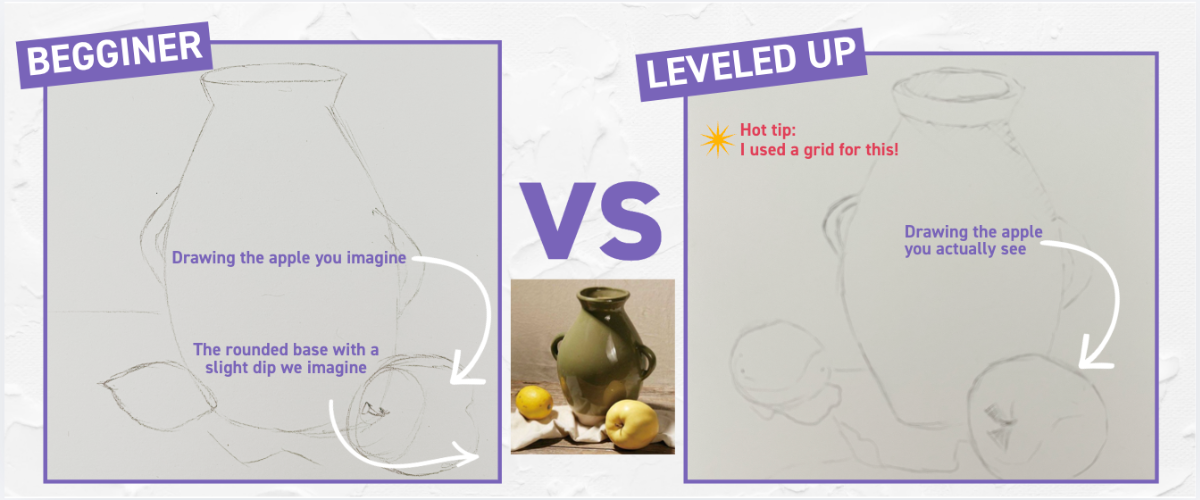
Beginner Mistake: Drawing What You Know Instead of What You See
If your drawing looks flat, generic, or strangely different from your reference, even though you’re “copying it,” your brain is probably taking shortcuts. Our brains love efficiency. They think they already know what an apple looks like, what a lemon looks like, or what a vase looks like, so they substitute symbols instead of observing what’s actually in front of us.
That’s why beginner drawings often lose the unique angles, proportions, and quirks that make a reference interesting. Instead of capturing reality, the drawing defaults to what the brain expects.
The fix: Actively observe, even when it feels uncomfortable.
Observation is a skill, and it takes practice. Slow down and question your assumptions before your pencil hits the page. Ask yourself: is the base really straight, or is it on a slight angle? Is the lemon actually symmetrical, or is it more oval and uneven? Is the apple sitting upright, or resting on its side?
To retrain your eye, try exercises that interrupt your brain’s autopilot:
Turn your reference upside down and draw it that way
Trace or focus on the negative space between objects rather than the objects themselves
Compare angles and relationships instead of outlining shapes
Ask “what’s unusual about this?” before you start drawing
The moment you begin drawing what you truly see rather than what you think you know, your work gains depth, accuracy, and character. Even if it feels wrong at first, trust the observation over the symbol. That discomfort usually means you’re learning.
.png)
Why Do I Feel So Far Behind Other Artists?
Beginner Mistake: Comparing Your Chapter 1 to Someone Else’s Chapter 10
If you’ve ever scrolled past incredible artwork online and immediately felt like you’re behind, you’re not failing, you’re just seeing a very edited version of someone else’s journey. Social media shows finished pieces, polished styles, and highlight reels, not the sketchbooks full of rough studies, abandoned canvases, or the years of quiet practice it took to get there.
This kind of comparison is one of the most damaging habits for beginner artists because it distorts reality. You’re measuring your early learning stage against someone else’s long-term progress, which makes it easy to miss your own improvement entirely.
The fix: Compare direction, not distance.
If you’re learning, experimenting, and showing up consistently, you’re doing exactly what you should be doing. Artistic skill builds gradually and unevenly. Progress stacks quietly, and it rarely looks impressive while it’s happening.
A more useful question than “why am I not there yet?” is “am I better than I was last month?”
That shift keeps your focus on growth rather than comparison, and it’s the only benchmark that actually matters.

Beginner Artist FAQs
How long does it take to get good at drawing or painting?
There’s no fixed timeline, but most beginner artists notice clear improvement within a few months of consistent practice. Focusing on fundamentals like shape, value, and observation speeds this up far more than practising finished pieces alone.
Why do my acrylic paintings look dull or muddy?
Acrylic paintings often look dull when colours are overblended, poorly planned, or shaded with black. Cleaner colour transitions and intentional shadow mixing help colours stay vibrant and dimensional.
Should beginner artists use expensive art supplies?
Beginner artists don’t need expensive supplies to improve. Reliable student-grade materials are more than enough until you understand which tools actually suit your style and workflow.
Is it normal for my art to look worse before it gets better?
Yes, this is completely normal. It usually means your eye is improving faster than your technical skill, which is a positive sign of learning rather than failure.
How often should beginners practise art?
Short, regular practice sessions are more effective than long, inconsistent ones. Even 20–30 minutes a few times a week is enough to build skill over time.
Why don’t my drawings look like the reference?
Most beginner drawings don’t match the reference because the artist is drawing symbols from memory instead of observing angles, proportions, and negative space accurately.
Is tracing bad for learning to draw?
Tracing isn’t bad, but it shouldn’t replace observational drawing. It can help you understand shapes and proportions, but real improvement comes from drawing what you see.
What is the best art medium for beginners?
Acrylic paint and graphite drawing are two of the best mediums for beginners. Both are versatile, forgiving, and allow you to learn core skills without complex setup.
How do I stop overworking my artwork?
To avoid overworking, work in clear stages, step back regularly, and let layers dry instead of constantly fixing wet areas. Knowing when to stop is a skill that improves with practice.
Is it bad to copy other artists when learning?
Studying and learning from other artists is normal and encouraged. Passing someone else’s work off as your own, however, is not.
Why do my shadows look flat?
Shadows usually look flat when they’re too dark, too uniform, or disconnected from the base colour. Building shadows using colour variation creates more depth and realism.
What should beginner artists focus on first?
Beginner artists should focus on shapes, values, and observation before worrying about style. Strong fundamentals make every future skill easier.

Ready to Fix These Mistakes for Real?
Every artist starts exactly where you are. The difference is access to the right tools, the right advice, and the confidence to keep going.
At the Shed, we stock beginner-friendly paints, pencils, sketchbooks, brushes, and learning tools that actually support skill-building, not overwhelm. Whether you’re learning to blend acrylics properly, map a portrait, or train your eye to see what’s really there, we’ve got you covered.
Stock the right tools, fix the habits holding you back, and keep showing up.
That’s how artists are made.
Shop beginner art supplies now and start your next chapter the right way.